Page 1 of 3 123 LastLast
Results 1 to 20 of 56

Thread: Lesson One : Understanding the Texture Layout

  1. #1
    B. Ward's Avatar ★★★★ RockNRolla ★★★★
    Join Date
    Feb 2007
    Location
    East Coast, United States
    Posts
    4,376

    Default Lesson One : Understanding the Texture Layout

    Introduction


    • In this lesson we will examine an existing vanilla texture and understand its makeup in regards to the model(s) it affects.


    File Setup


    • First you need to download the course material from here.
    • Once you have done so extract the mod folder into your Medieval II Total War directory.
    • Run the "Basic_Mesh_Texturing_cfgfixer.bat" to create your .cfg file based on your existing .cfg settings.
    • Next extract Course Material.rar somewhere on your computer so you can recall these files when needed. It should include en_lmail_hmail_template.psd and final heater_template_diff.psd. These will be the files used in this part of the course.

    Let's begin, shall we?

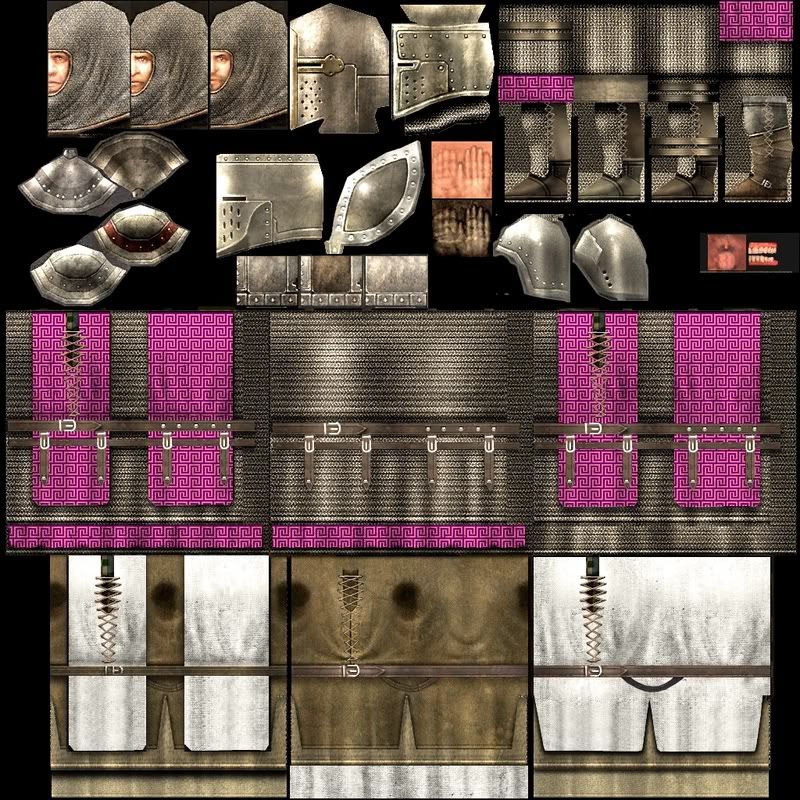
    First open en_lmail_hmail_template.psd. This should open in Photoshop as well as The Gimp. Your file should look like this.
    Spoiler Alert, click show to read: 


    Now let's examine the parts of the texture to understand them better. Here I have numbered them and will explain their roll in the mesh. Most of the time, the texture is self explanatory and you should be able to easily determine which parts of the texture designate to which parts of the mesh.
    Spoiler Alert, click show to read: 


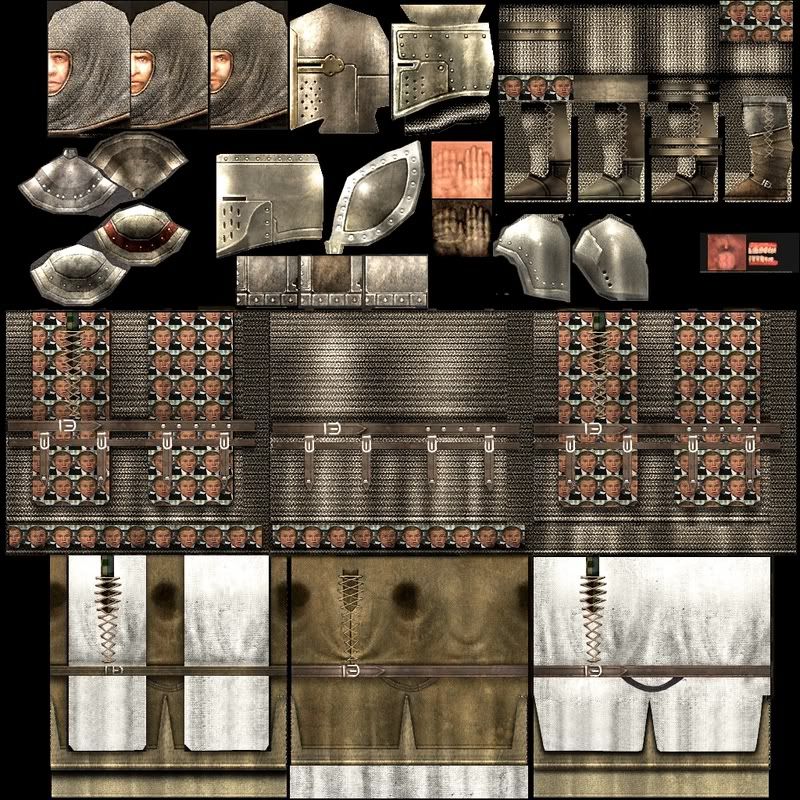
    1. Represents the faces and heads.
    2. Represents the various helmets.
    3. Represents the hands.
    4. Represents the arms.
    5. Represents the legs.
    6. Represents the teeth and mouth.
    7. Represents the heavy bodies. (hmail)
    8. Represents the light bodies. (lmail)

    Once you designate what each element of the texture affects which part of the mesh, you will be able to begin your retexturing process. A common mesh that uses this texture is the Feudal Knight. For all intents and purposes of this lesson we will concentrate on retexturing the Feudal Knight mesh as shown below.
    Spoiler Alert, click show to read: 


    Now by looking at the model and the texture itself, it's pretty easy to see how they relate to one another. Now let's concentrate on changing the appearance of the clothing of the Feudal Knight. So let's look back at the file en_lmail_hmail_template.psd which should be open in either Photoshop or The Gimp. The template is divided into layers to not only keep things organized but help you easily customize the clothing of the mesh. First let's find the group called "en_hmail_1". For those using The Gimp, the groups from the .psd file won't show up properly so I've also included a screen to show you the layers we'll be focusing on as well. The names of the layers will be blue for Photoshop and red for The Gimp.
    Spoiler Alert, click show to read: 


    Now what we want to do is create a new layer above Tunic/Tunic#3 and Tunic_Under/Tunic_Under#2. These layers will become our overlay layers where all the magic happens. We will rename these layers Overlay_Top & Overlay_Bottom. And set their Blending Option/Mode to "Multiply". Linear Burn also works well in Photoshop. Your layers should now look like the diagram shown below.
    Spoiler Alert, click show to read: 


    Now that you have those layers set up, select a color to be used. You may use any color you wish as it will be at your discretion. For all intents and purposes I will be using a dark shade of red; color code (100, 0, 0). Now for those of you using Photoshop, right click on the box in the layer Tunic and select the option "Select Pixels". (
    Alternatively you can hold down the ctrl key and click on the box in the Tunic layer to select the layer outline as well
    ). This should select the layer outline. Once you've done that make sure you're editing the Overlay_Top layer by clicking on it and fill in the layer outline with your color of choice. It should have created your color as well as taken on the attributes of the fabric base texture. For you Gimp users, right click on Tunic#3 and select the option "Alpha to Selection". This should select the layer outline. Next click on the Overlay_Top layer and fill in with the color of your choice. Refer to the diagrams below for visual aid.
    Spoiler Alert, click show to read: 


    Following that method, continue until you have colored the next two bodies beside that one and the sleeves at the top of the texture. Once you have done that, your texture should resemble something similar to the diagram below.
    Spoiler Alert, click show to read: 


    As shown in this render, this is how the mesh will have changed within the game. You can see now the Feudal Knight is dressed in a red tunic instead of a white one now.
    Spoiler Alert, click show to read: 


    This concludes the first lesson. I hope you have a basic handle on the texture elements and an easy and efficient way to color and recolor them as you see fit. The next lesson will be actually creating a retexture to be placed in the game engine. We will still be focusing on the Feudal Knight, but we will also have to retexture the attachment set that goes along with this mesh. If there are any question, please post them. Also, I would like for all students to post their basic retexture as described in this lesson so I know you have to basics behind this before we move along. I hope I was clear enough for your understanding and if there is anything you think I could've done better, please don't hesitate to let me know.

    Cheers,
    B.Ward
    Last edited by B. Ward; October 14, 2008 at 11:02 AM.

  2. #2
    Romanos IV's Avatar The 120th Article, § 4
    Join Date
    Jun 2008
    Location
    the hell outta here (Athens, European Client State of Greece)
    Posts
    3,882

    Default Re: Lesson One : Understanding the Texture Layout

    xcuse me, where is "Armory.rar" ? As far as I can see, it's not in the downloaded files...

    Also, since some of the files of the mod folder are in, should we add the rest from another mod of us (mymod) ?

    Under the noble patronage of Jimkatalanos

  3. #3
    Augustus Lucifer's Avatar Life = Like a beanstalk
    Patrician Citizen

    Join Date
    Aug 2006
    Location
    Mote of Dust
    Posts
    10,725

    Default Re: Lesson One : Understanding the Texture Layout

    Quote Originally Posted by Romanos IV View Post
    xcuse me, where is "Armory.rar" ? As far as I can see, it's not in the downloaded files...

    Also, since some of the files of the mod folder are in, should we add the rest from another mod of us (mymod) ?

    It was a mis-type, he probably changed the file name between writing this and uploading it. If you look at the files specified in the above post, you'll see they're the same files that are included in "Course Material.rar". So:

    Course Material.rar = Armory.rar

    I do have a question about naming though. In Step #5(Counting spoilers) you say that we need to "create a new layer above Tunic/Tunic#3 and Tunic_Under/Tunic_Under#1". In the above picture for GIMP though, you have created the red box around Tunic_Under#2 as opposed to Tunic_Under#1. So which one are we looking at using? (I assumed you meant #2 since the circled one in the second picture is above #2, and you wanted them above on the list)

    Also, isn't it bloody amazing how the smallest little typo can confuse someone new , reminds me of the scripting class and capitalization .
    Last edited by Augustus Lucifer; October 14, 2008 at 08:10 AM.

  4. #4
    B. Ward's Avatar ★★★★ RockNRolla ★★★★
    Join Date
    Feb 2007
    Location
    East Coast, United States
    Posts
    4,376

    Default Re: Lesson One : Understanding the Texture Layout

    Sorry guys, it should be fixed now. The file on my computer that was uploaded was actually called Armory.rar and you shouldn't add anything to your mod folder yet.

  5. #5
    Augustus Lucifer's Avatar Life = Like a beanstalk
    Patrician Citizen

    Join Date
    Aug 2006
    Location
    Mote of Dust
    Posts
    10,725

    Default Re: Lesson One : Understanding the Texture Layout

    It's all good, and nice first lesson by the way, very easy to follow for someone who knows literally nothing about textures . For anyone who may be wondering what the other layers they need to create overlays for to look like the example, just click the layer and see what it highlights to get an idea. It's best if you find out on your own, since every texture is different, but the ones you need are(in GIMP):

    Spoiler Alert, click show to read: 

    Sleeve_1
    Sleeve_4
    Tunic#3
    Tunic_Under#2
    Tunic_Under#1
    Tunic#2


    Here's mine, I'm using wacky textures that I made into GIMP-usable texture bucket fill files, because that's how I roll homie

    Pink Swirleys
    Spoiler Alert, click show to read: 


    George W. Bush's Monkey Face
    Spoiler Alert, click show to read: 


    Good job man! The Bush monkey face was a nice touch. :thumbsup4
    Last edited by B. Ward; October 14, 2008 at 11:10 PM.

  6. #6
    Harry Lime's Avatar Not a ToS violation
    Artifex took an arrow to the knee

    Join Date
    Feb 2005
    Location
    Kent, England
    Posts
    15,771

    Default Re: Lesson One : Understanding the Texture Layout

    Is it just my browser or do some of them spoilers not actually show anything? The first 3 underneath the numbering of the body parts don't actually open to reveal anything.
    Proud Patron of derdrakken, dave scarface, J@mes & irishron
    Indulging in the insight & intelligence of imb39

  7. #7
    Romanos IV's Avatar The 120th Article, § 4
    Join Date
    Jun 2008
    Location
    the hell outta here (Athens, European Client State of Greece)
    Posts
    3,882

    Default Re: Lesson One : Understanding the Texture Layout

    Click this and wait a little, that's what I did and it worked!
    Under the noble patronage of Jimkatalanos

  8. #8
    B. Ward's Avatar ★★★★ RockNRolla ★★★★
    Join Date
    Feb 2007
    Location
    East Coast, United States
    Posts
    4,376

    Default Re: Lesson One : Understanding the Texture Layout

    Tinypic is trippin...I noticed it also...I'll upload it elsewhere and hopes it fixes the issue...man I'm starting to hate technology.

  9. #9
    Harry Lime's Avatar Not a ToS violation
    Artifex took an arrow to the knee

    Join Date
    Feb 2005
    Location
    Kent, England
    Posts
    15,771

    Default Re: Lesson One : Understanding the Texture Layout

    Still waiting, still dreaming..

    It's not important to me as I've been using B Ward's templates since he released them, just thought it odd that the spoilers weren't working and it could be confusing for newer skinners.

    EDIT: Was replying to Romanos IV.
    Proud Patron of derdrakken, dave scarface, J@mes & irishron
    Indulging in the insight & intelligence of imb39

  10. #10
    B. Ward's Avatar ★★★★ RockNRolla ★★★★
    Join Date
    Feb 2007
    Location
    East Coast, United States
    Posts
    4,376

    Default Re: Lesson One : Understanding the Texture Layout

    Should be rectified now. Stupid image hosting.

  11. #11
    Harry Lime's Avatar Not a ToS violation
    Artifex took an arrow to the knee

    Join Date
    Feb 2005
    Location
    Kent, England
    Posts
    15,771

    Default Re: Lesson One : Understanding the Texture Layout

    Here's the completed skin..

    Spoiler Alert, click show to read: 


    I don't know if they have changed this in a different version of Photoshop but where you stated
    Now for those of you using Photoshop, right click on the box in the layer Tunic and select the option "Select Pixels".
    in my version it's called Select Layer Transparency.

    Nice job Mr. Lime. And yes I'm using Photoshop CS3 and it says Select Pixels. I'm glad you all were able to figure out the correct procedure for earlier Photoshop versions. I'll note this for future reference, thanks man. :thumbsup4
    Last edited by B. Ward; October 14, 2008 at 11:09 PM.
    Proud Patron of derdrakken, dave scarface, J@mes & irishron
    Indulging in the insight & intelligence of imb39

  12. #12

    Default Re: Lesson One : Understanding the Texture Layout

    OK, I did manage a finished product. (I hope you all like salmon pink!)
    I started off in photoshop and all was well until the 'Select pixels' part which on my version appears to be 'Select layer transparency'. Then I discover that I can't actually find the bucket fill...
    Onto Gimp, this was much easier for me to use and I happily went along turning all the white to pink, realised I had changed more than instructed and repeatedly clicked on undo to get back. I had a strange problem with sleeves 1 and 4 at first, with me bucket filling and no change occurring.
    Later I remembered that I know how the layers work and turned off the ones above Overlay_Top to see my nice pink sleeves were hidden beneath the whole time.
    Spoiler Alert, click show to read: 

    [url=http://imageshack.us][/


    A very nicely written and well presented tutorial B. Ward, thanks! Added to your rep, not that you need it.
    Just one question, what was Overlay_Bottom for? Or do we use that in the next step...

    Overlay_Bottom layer is for the layer Tunic_Under/Tunic_Under#2. Every fabric layer should be given their own overlay layer to make it easier for you to only edit that part if you decide to make changes later on down the road. For example, you may want the top to be red but the bottom to be blue. Once you fix that, the image will be perfect. :thumbsup4


    Realised what I did wrong, I didn't add a new layer for each section...
    Spoiler Alert, click show to read: 

    [url=http://imageshack.us][/
    Last edited by Eothese; October 15, 2008 at 02:29 PM.

  13. #13

    Default Re: Lesson One : Understanding the Texture Layout

    Love harry limes colour

    what was the overlay_bottom for??


    also i know its wrong as some place but will fix

    Can't see your image Nakharar. But to answer your question, the Overlay_Bottom layer is for the layer Tunic_Under/Tunic_Under#2. Every fabric layer should be given their own overlay layer to make it easier for you to only edit that part if you decide to make changes later on down the road. For example, you may want the top to be red but the bottom to be blue.
    Last edited by B. Ward; October 14, 2008 at 11:07 PM.

  14. #14

    Default Re: Lesson One : Understanding the Texture Layout

    Just realised that my laces and belts got 'pinkified', maybe its the way I saved it straight to jpeg so I could upload it here...

    #Edit, realised what I did wrong, corrected it and uploaded a new jpeg.
    Last edited by Eothese; October 15, 2008 at 02:30 PM.

  15. #15
    Harry Lime's Avatar Not a ToS violation
    Artifex took an arrow to the knee

    Join Date
    Feb 2005
    Location
    Kent, England
    Posts
    15,771

    Default Re: Lesson One : Understanding the Texture Layout

    No, it looks like you had your salmon pink colour layer above the belt layer, instead of above the tunic layers.

    Wait you used Gimp didn't you? Sorry, I don't know then.
    Proud Patron of derdrakken, dave scarface, J@mes & irishron
    Indulging in the insight & intelligence of imb39

  16. #16

    Default Re: Lesson One : Understanding the Texture Layout

    Here is mine:
    Spoiler Alert, click show to read: 

    Spoiler Alert, click show to read: 

    Sorry for not using the Feudal Knight i will next time.
    Spoiler Alert, click show to read: 


    Well, I wasn't looking for a model render, but it's fine. You did complete the lesson though by adding the color to the correct part of the texture. Looks great! :thumbsup4
    Last edited by B. Ward; October 14, 2008 at 11:04 PM.
    Contribuitor IBIICB-WOTN-Modeler-Scripter


  17. #17

    Default Re: Lesson One : Understanding the Texture Layout

    Nice one Ice

  18. #18
    GrnEyedDvl's Avatar Liberalism is a Socially Transmitted Disease
    Artifex Technical Staff

    Join Date
    Jan 2007
    Location
    Denver CO
    Posts
    23,844
    Blog Entries
    10

    Default Re: Lesson One : Understanding the Texture Layout

    Quote Originally Posted by B. Ward View Post
    Should be rectified now. Stupid image hosting.
    If you need a place to host images let me know. I will try to get lesson 1 butchered tonight.

  19. #19

    Default Re: Lesson One : Understanding the Texture Layout

    Ok, here's mine:
    Spoiler Alert, click show to read: 


    Great job! B. Ward
    Last edited by B. Ward; October 14, 2008 at 11:02 PM.
    Support Kosovo!


    (\__/)
    (O.o )
    (> < ) This is Bunny. Copy Bunny into your signature to help him on his way to world domination!

  20. #20
    B. Ward's Avatar ★★★★ RockNRolla ★★★★
    Join Date
    Feb 2007
    Location
    East Coast, United States
    Posts
    4,376

    Default Re: Lesson One : Understanding the Texture Layout

    Thanks to everyone who worked on the lesson so fast. Good work so far guys :thumbsup4

    Check your posts for comments on your textures.
    Last edited by B. Ward; October 14, 2008 at 11:10 PM.

Page 1 of 3 123 LastLast

Posting Permissions

  • You may not post new threads
  • You may not post replies
  • You may not post attachments
  • You may not edit your posts
  •