Page 1 of 2 12 LastLast
Results 1 to 20 of 24

Thread: Making Unit cards with 3ds Max

  1. #1

    Default Making Unit cards with 3ds Max

    How to make info and battle cards for Rome: Total War
    using 3ds Max


    Index

    **Extra** How to Mount a Cavalry Unit for an Info card

    Introduction

    This tutorial uses 3ds Max Design 2009 32 bit and assumes you have installed the cas importer/exporter by Vercingetorix.
    Here's a list of what you will need.

    1) AutoDesk 3ds Max (not included in the tutorial pack)
    2)
    The CAS importer/exporter plug-in from Vercingetorix. ( comes with install instructions )

    3) A model ( the .cas file )

    4)
    The texture file that goes with the model. This will be a .dds file

    5) A .MAX file template, found in the Barbarian Invasion expansion. ( found in Rome - Total War\bi\data\ui\unit_info\huns )

    6) An animation file that puts the unit in the correct pose. ( also a .cas file )

    7)
    IDX Extractor for extracting the animations
    To save time, you can get all the above, including a custom template and animation from the following link.

    tutorial pack 1 (3ds max NOT included)

    For this tutorial, we will use a Spartan model made by Spirit of Rob and these are the keys that we will be most involved with.


    Starting Up

    We begin by loading the template.max file from the download by double left clicking on it.
    Ignore any messages about missing files by clicking Open and if prompted, click Continue
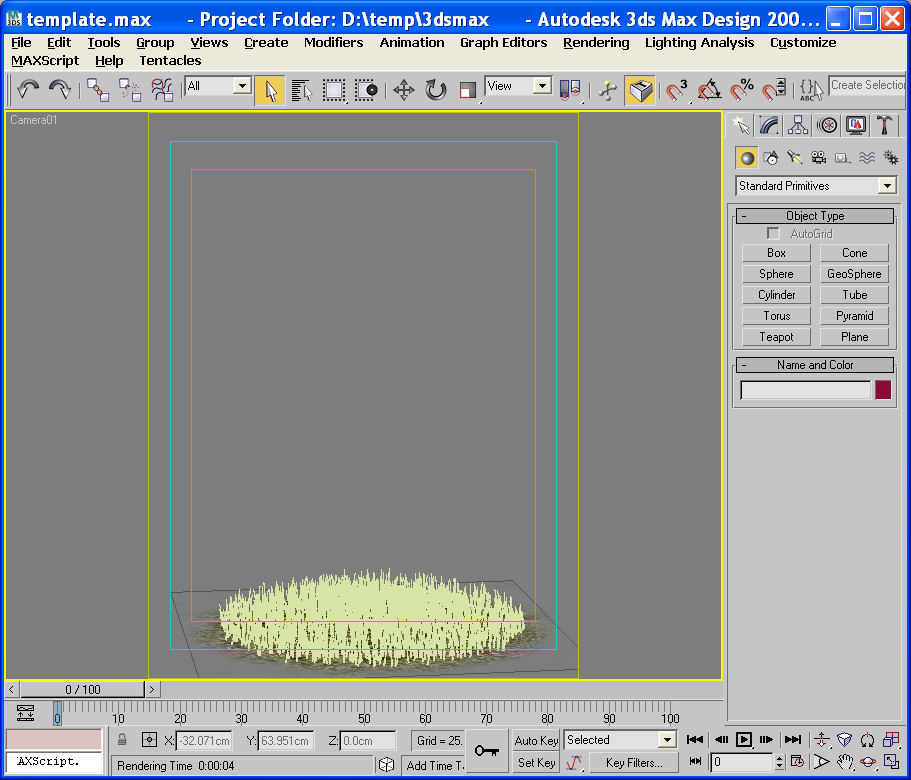
    You should end up with this screen.


    Activating the CAS importer

    To import a model, we first have to activate the .cas importer like this
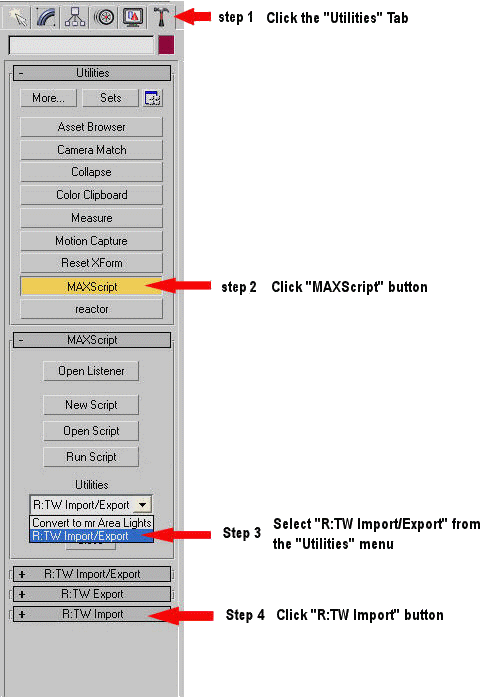
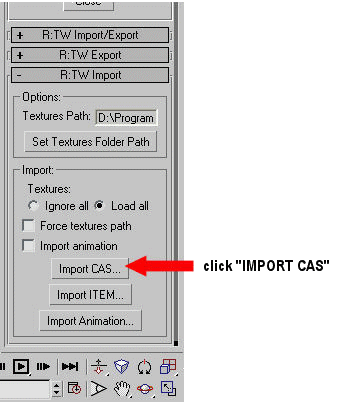


    Importing a model

    A) click Import CAS... and then.... B) select SoR_Spartans.cas in the Open dialogue window and click Open


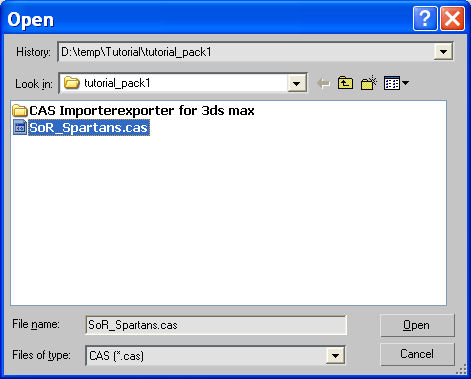
    In this instance, we end up with a green blob in the centre of the screen.
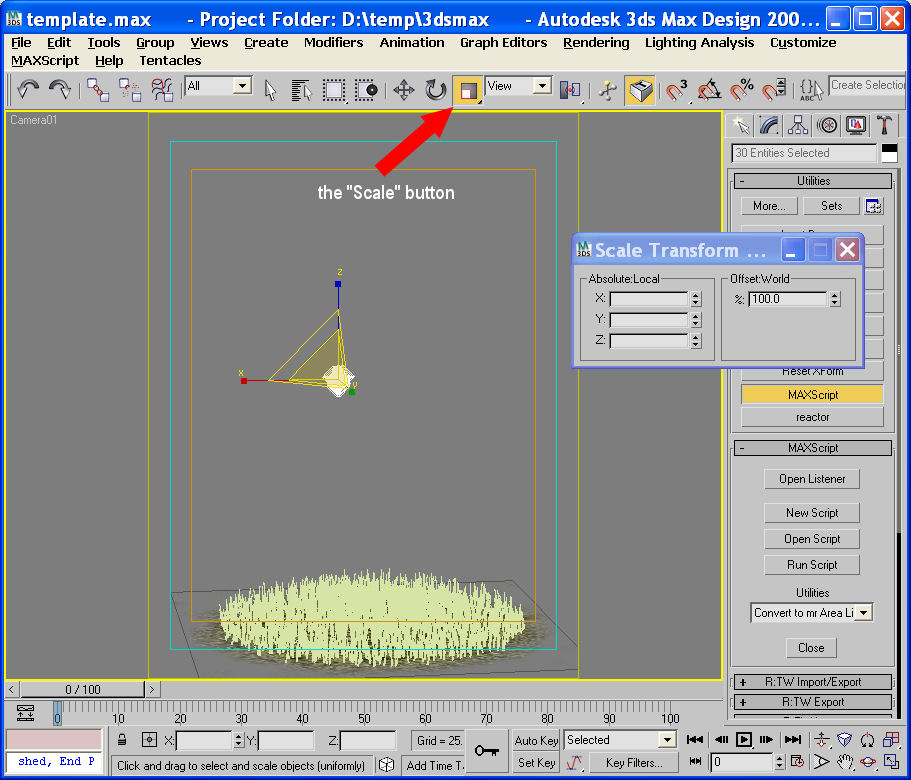

    Scaling
    Now we have to make the green blob larger by increasing its scale.
    We do this by drawing a selection box around it using the Select tool
    , carefully avoiding the grass at the bottom.

    Then we right click the Select and Uniform Scale button to bring up the Scale Transform dialogue box.

    Tip: Select everything, then, while holding down the Ctrl key, carefully click on the grass and ground , one at a time to de-select them.


    We need to increase the scale by a factor of about 3700 by typing it into the X, Y, and Z co-ordinate fields, in the Scale Transform dialogue window,
    under the "Absolute: Local" section in this sequence.

    Click in the X: field and enter 3700 then hit the Tab key
    In the Y: field, enter 3700 then hit the Tab key
    In the Z: field, enter 3700 then hit the Enter key

    Close the Scale Transform dialogue window. 3ds Max should now look like this...


    Adding a texture

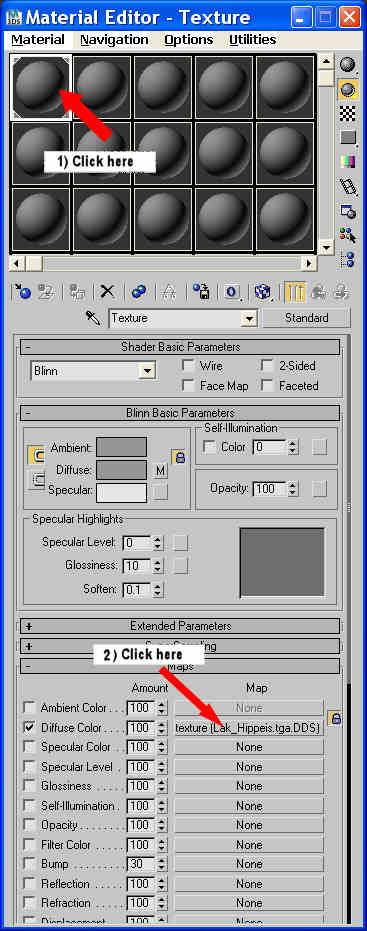
    Now we load and apply the texture. Press the M key, or click the Materials Editor button . Then...

    1) Click the first material location
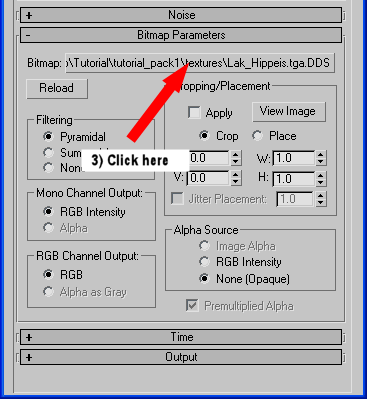
    2) In the Maps section, click the Diffuse Color texture button to access the Bitmap Parameters section

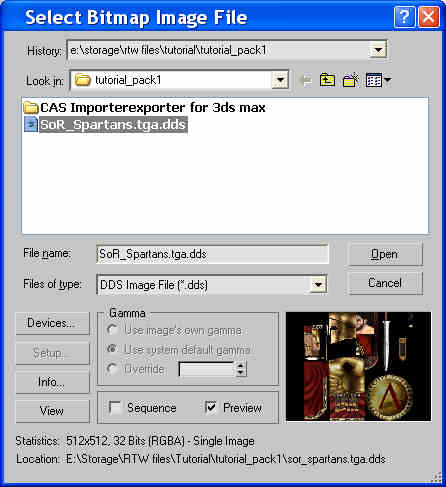
    3) In the Bitmap Parameters section, click on the button opposite Bitmap: and select the file SoR_Spartans.tga.dds and click open


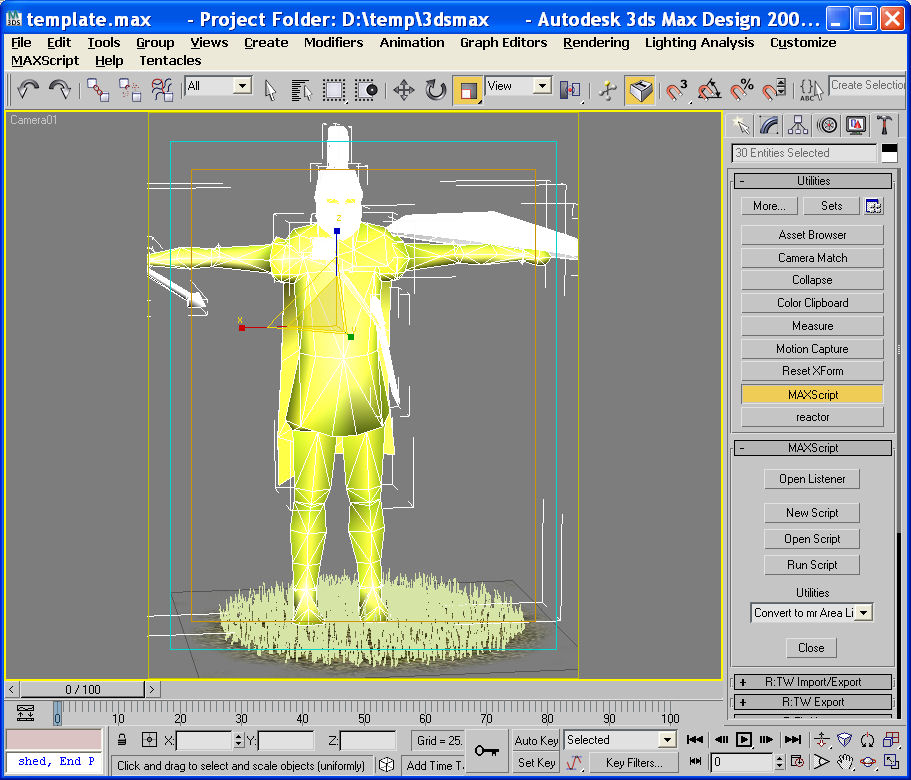
    The screen should now look like this

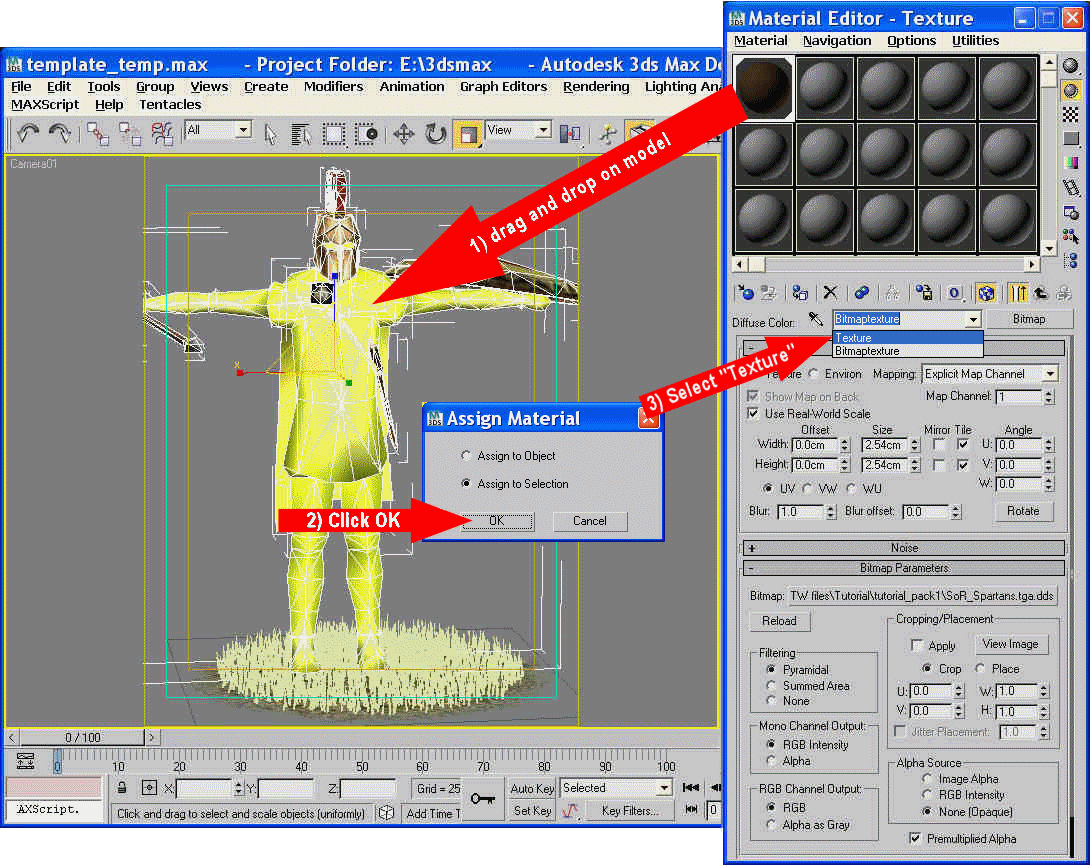
    For the next step, make sure that all the model is selected. If you have to, click on the Select tool and draw a selection box around the model,
    but not the grass or the ground.

    1) Drag the Material from the material location and drop it onto the model
    2) Select Assign to Selection and click OK

    3)
    In the Diffuse Color: drop-down menu, change it from Bitmaptexture to Texture ( This is precursor to setting the alpha channel )


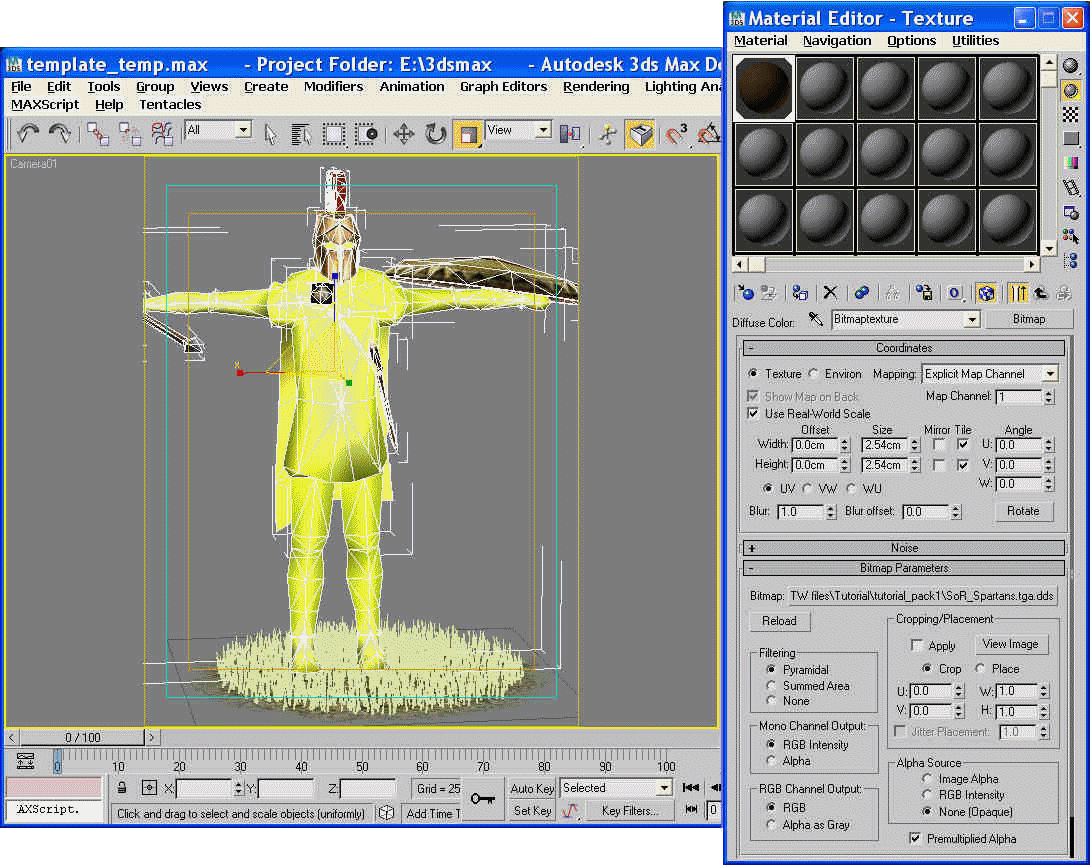
    Setting the Alpha channel

    That's the texture done. All we have to do now is to sort out the alpha channel.

    1) In the Diffuse Color: drop-down menu, change it from Bitmaptexture to Texture ( see step 3 in previous section )
    2) Drag the letter M, opposite where it says Diffuse: and drop it on top of the small blank button opposite Opacity:
    3) Select Copy and click OK


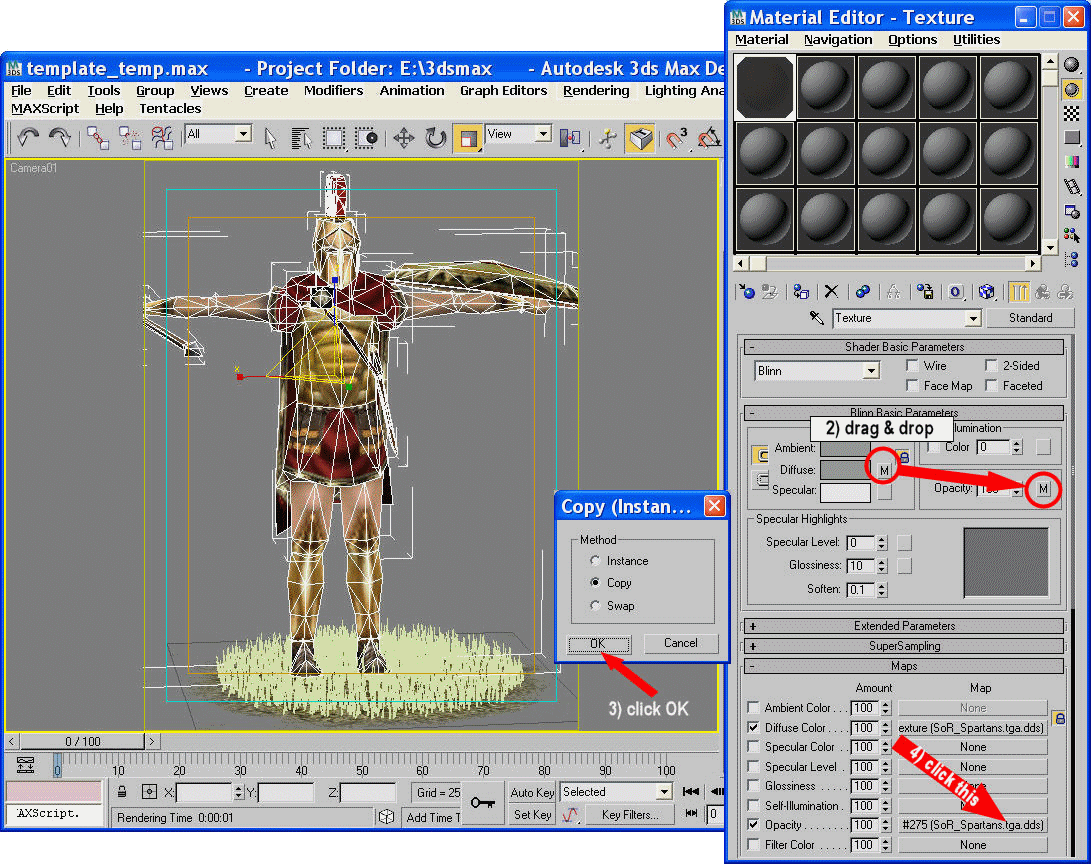
    After clicking OK, there are two more settings that need adjusting.
    4) First, click the button in the Maps section opposite Opacity....


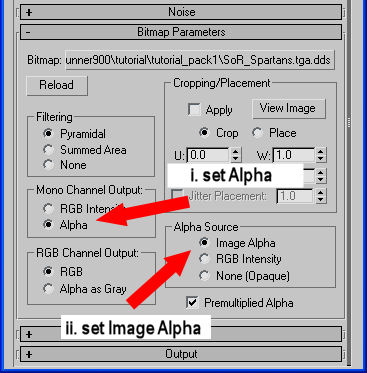
    Then in the Bitmap Parameters section
    i. Set Mono Channel Output to Alpha
    ii. Set Alpha Source to Image Alpha

    Your done. You can close the Material Editor.


    Importing an animation stance

    Now we have to set our unit into an appropriate stance. This involves importing an animation which is also a .CAS file. I have included one in the tutorial_pack
    for convenience
    . There are a wide variety of animation files packed away in <game folder>\Data\animations but they need to be extracted with theIDX Extractor. This is also included in the tutorial_pack along with instructions for its use.


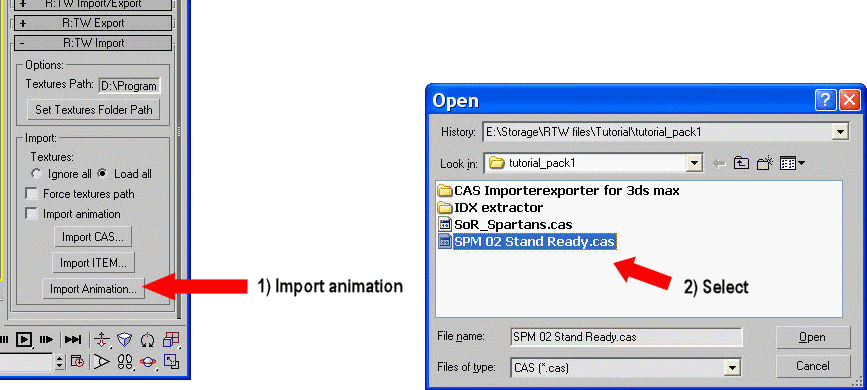
    1) Click the Utilities tab and under R:TW Import, click Import Animation
    2) Select SPM 02 Stand Ready.cas and Open
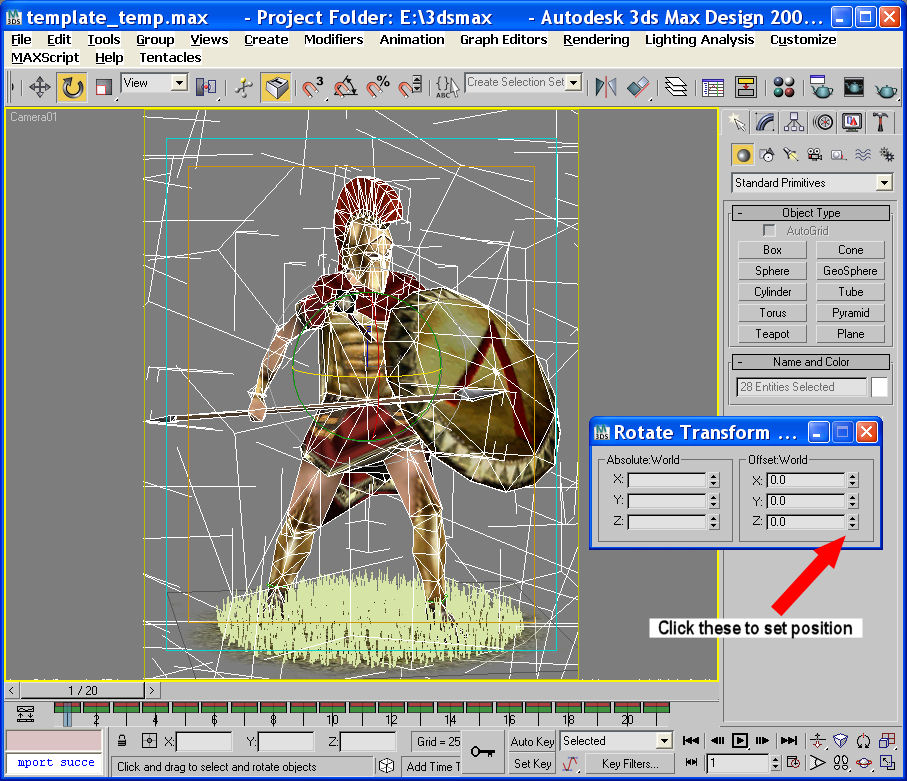

    Positioning

    To get him in the correct position, first, make sure he is still selected, then right click on the Select and Move tool
    You can grab the red green and blue "handles" with your pointer and move him about to set a rough position and then use the Offset: World X,Y Z tools
    for fine adjustment.


    To rotate him you right click the Select and Rotate tool
    Again, you can grab the model in the centre to make rough adjustments and then use the Offset: World X,Y Z tools for fine adjustment. The Z tool is of
    more relevance here


    As you can see. It's a bit of a mess when I activate the rotation tool. Probably due to some incompatibility with 3ds Max, my graphics card,
    the cas importer or all three.
    Fortunately it doesn't affect the finished rendered scene

    Speaking of which...


    Rendering and saving an Info Card

    Most models have two weapons in their hands, usually spear and sword, so decide which one you want to include in the finished render and delete the one
    you don't want. You do this by carefully selecting the unwanted item with the Select Object tool and then hitting the Delete key on your keyboard.

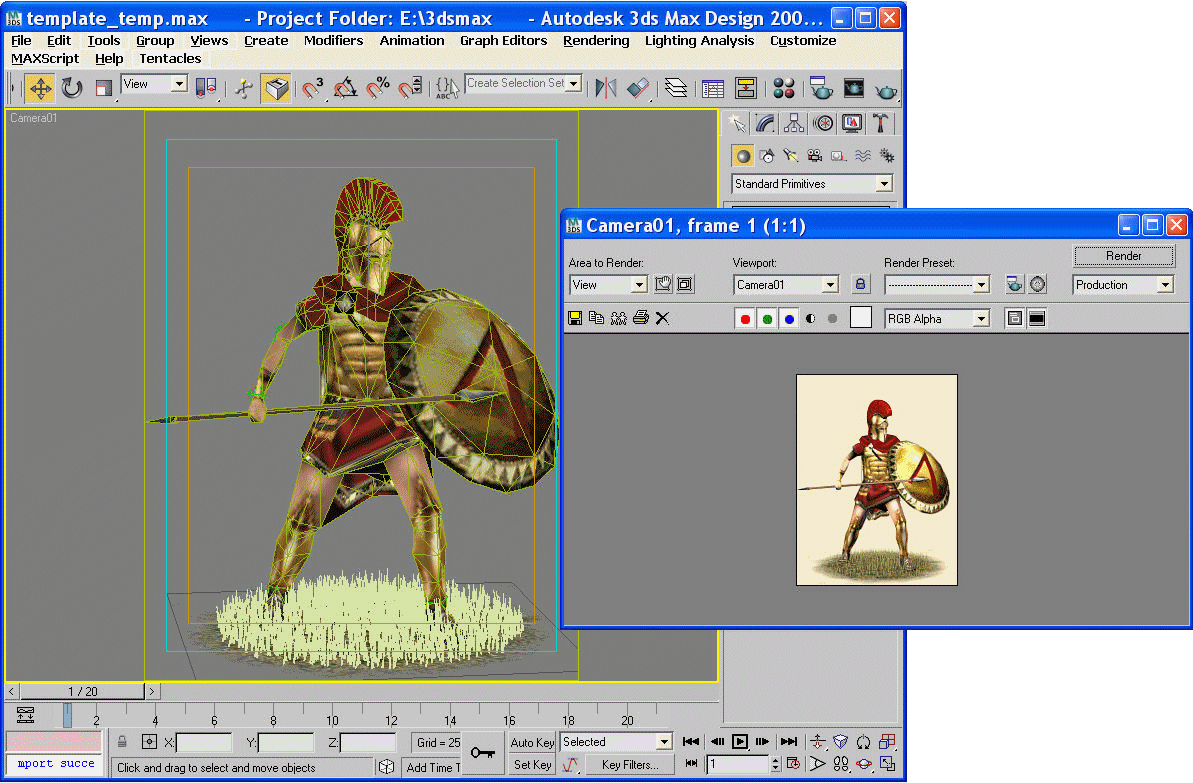
    Select the Rendered Frame tool from the top tool bar , click the Render button and at last we get...


    The finished image is the correct size for info cards so we can save this picture straight away by clicking on the save button

    Info card size is
    160 X 210
    Battle card size is
    48 X 64


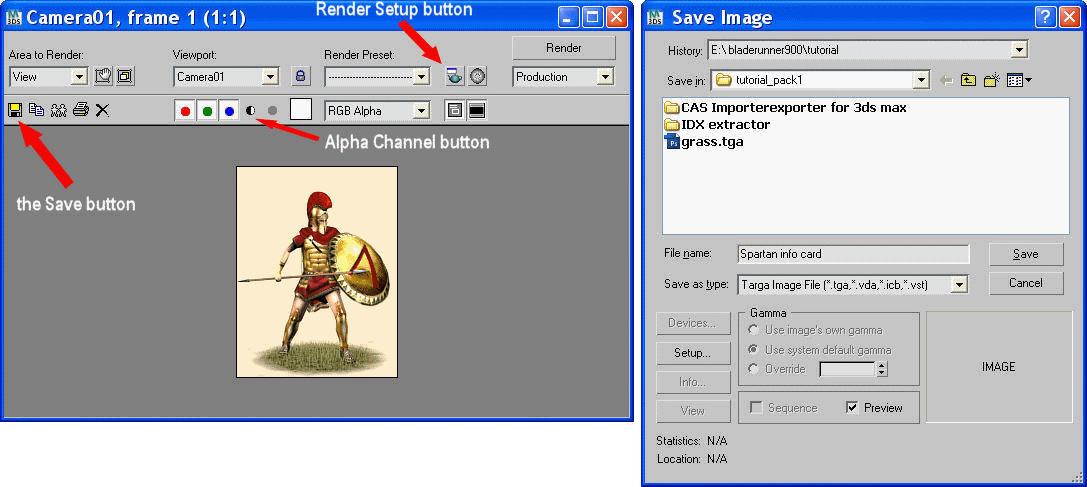
    Make sure you select Targa Image File (.tga) as the file format, give it a unique name and click Save.
    I save my cards in 32 bit and NO compression
    If you want to see the alpha channel, click on the Display Alpha Channel button


    Rendering and saving a Battle Card

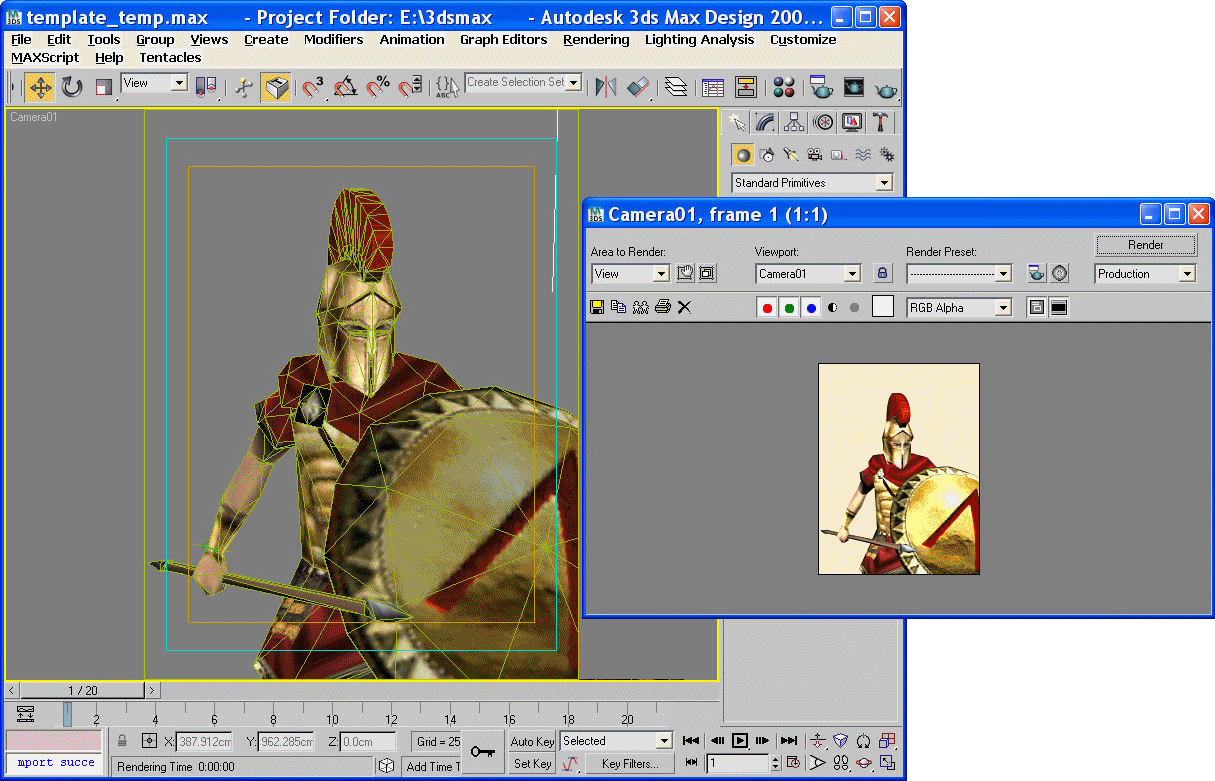
    To render battle cards, we first need to re-size and re-position the model in the main view of 3ds Max.

    This is a repeat of the previous Positioning and Orientation section earlier, only this time, before starting, delete the grass and ground
    so they do not intrude in the rendered scene by accident. To do that you just select the grass and ground one at a time and hit the Delete key.

    Here is an example of what you could end up with.


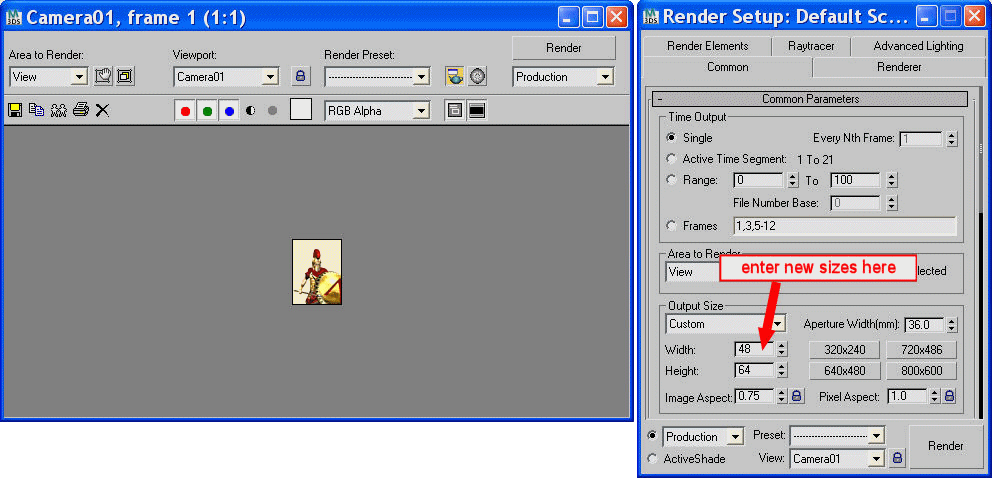
    Obviously we need to reduce the size of the finished render. You could save it now and reduce the size in your favourite graphics program. But I prefer to do
    it in the rendering, so as not to lose any detail that reduction may cause.
    Okay. Select the Render Setup tool and in the Output Size section, we need to change the Width: to 48 and the Height: to 64.
    Click the Render button and if all is well you get this


    Saving is the same as for the Info card, only this time, include battle in the name so you know which is which

    FINISHED!

    Hope you followed all that and happy rendering! You can also find this tutorial at my web site here

    If you want to know how to do the same for a cavalry unit then have a look at my Mounting a Cavalry Unit tutorial for one way of doing it.

    Credits
    Special thanks go to:-


    spirit_of_rob for permission to use his excellent Spartan unit.
    Tony83 for helping me with the mysteries of BB code
    Last edited by bladerunner900; November 29, 2008 at 09:50 PM.

  2. #2
    D|major's Avatar the key of glory
    Join Date
    Oct 2006
    Location
    Hamburg, Germany
    Posts
    994

    Default Re: Making Unit cards with 3ds Max

    wow this is cool! Thanks and +rep for it. I'm definitely gonna try this
    formerly known as D|need
    m2tw cinematic editor tutorials as video and thread | my total war videos
    the picture of the week subforum with great artworks | my pics and vids gallery
    under the patronage of b. ward

  3. #3

    Default Re: Making Unit cards with 3ds Max

    IT's GOOD tutorial
    THX

  4. #4

    Default Re: Making Unit cards with 3ds Max

    Birillant Tutorial, but the template in rar packet is not working, could you please reupload it ? (Btw, I am using 3d max 9.0)

  5. #5

    Default Re: Making Unit cards with 3ds Max

    Alternatively, inside your BI\data\ui\unit_info\huns folder there are some max scenes with the UI templates. You just have load one, delete the unit and you will have the template.

  6. #6

    Default Re: Making Unit cards with 3ds Max

    Quote Originally Posted by HeroSK View Post
    Birillant Tutorial, but the template in rar packet is not working, could you please reupload it ? (Btw, I am using 3d max 9.0)

    I've just updated the rar pack to include a template out of the huns folder in BI called steppe_swordsmen.max.

    3ds max 9.0 will warn you that it is an older version type when you load it, but when you save it later, it will be saved as a newer type. This means that an earlier version of 3ds will probably not be able to load it. All the templates in the huns folder out of BI seem to be compatible with 3ds 7 and onwards. Just ignore any warnings about files being missing.

    Edit: Sorry Salvor. Just seen your post . Yes, there are lots more in that folder. Just delete the unit and you have a template.
    Last edited by bladerunner900; November 22, 2008 at 10:32 AM.

  7. #7

    Default Re: Making Unit cards with 3ds Max

    Quote Originally Posted by bladerunner900 View Post
    Edit: Sorry Salvor. Just seen your post . Yes, there are lots more in that folder. Just delete the unit and you have a template.
    [/SIZE][/FONT]
    Hey, thanks must go to you, man. After all, it is due to this amazing tutorial that I am able to make some unit cards

  8. #8
    Indefinitely Banned
    Join Date
    May 2006
    Location
    My Web.
    Posts
    17,514

    Default Re: Making Unit cards with 3ds Max

    First class tutorial matey, it's how I learned to do all the RTR renders for the FOE Previews.

  9. #9

    Default Re: Making Unit cards with 3ds Max

    I have a question, how to make unit cards for cavalry units ?:hmmm:

  10. #10
    Indefinitely Banned
    Join Date
    May 2006
    Location
    My Web.
    Posts
    17,514

    Default Re: Making Unit cards with 3ds Max

    Quote Originally Posted by HeroSK View Post
    I have a question, how to make unit cards for cavalry units ?:hmmm:
    Very carefully!

    Sorry, I couldn't resist that!

    I dare say there are a number of ways of doing it, but I tend to create rider and horse templates separately and, after applying the appropriate animations, merge the rider into the horse template.

    It can be fiddly positioning the rider on the horse but with care you should get good results.

    Maybe a suitable topic for another tutorial Bladerunner!

  11. #11

    Default Re: Making Unit cards with 3ds Max

    Quote Originally Posted by Tony83 View Post
    Very carefully!

    Sorry, I couldn't resist that!

    I dare say there are a number of ways of doing it, but I tend to create rider and horse templates separately and, after applying the appropriate animations, merge the rider into the horse template.

    It can be fiddly positioning the rider on the horse but with care you should get good results.

    Maybe a suitable topic for another tutorial Bladerunner!
    OK, I will try what you said Tony, Here more questions for entertaining you, enjoy..

    How to get rid of the egdes there, and make it round ?


  12. #12
    Indefinitely Banned
    Join Date
    May 2006
    Location
    My Web.
    Posts
    17,514

    Default Re: Making Unit cards with 3ds Max

    I'm guessing that that is an Alpha Channel mapping issue and beyond my limited expertise. Perhaps someone else can help you with this one.

  13. #13

    Default Re: Making Unit cards with 3ds Max

    Thanks I fixed it

  14. #14

    Default Re: Making Unit cards with 3ds Max

    Quote Originally Posted by HeroSK View Post
    I have a question, how to make unit cards for cavalry units ?:hmmm:
    I’ve put together a pack containing instructions and examples of how I re-worked a unit for the Extended Realism Mod a while ago.
    http://rapidshare.com/files/16807995...ial_pack_2.rar

    Here is a copy of the basic instructions out of the pack.

    Mounting a cavalry unit in 3ds Max

    1. Start 3ds and activate the cas import/export script
    2. Import the rider (illyria_peltast_high.cas)
    3. Increase the size by 20% by entering 120 in the x, y and z fields
    4. Import the rider animation
    5. Move the rider straight up in the air allowing clearance for the horse
    6. Import the horse cas
    7. Import the horse animation
    8. See stage 1
    9. Load horse texture into slot 1 and sort out the Alpha channel
    10. Load rider texture into slot 2 and sort out the Alpha channel
    11. If the “Material/Map Browser” pops up select “Bitmap” from the top of the list and proceed to select the texture
    12. Select the horse in scene and select the texture in slot 1 and click on the “Assign Material to Selection” button
    13. Select the rider in scene and select the texture in slot 2 and click on the “Assign Material to Selection” button
    14. See stage 2
    15. Lower the rider onto the horse and adjust position
    16. Save the scene
    17. See stage 3
    18. Load an Info Card template
    19. “Merge” the previously saved scene into the template
    20. Proceed as in previous tutorial from “Scaling” section

    Hope this helps.

    *EDIT* I've added a more thorough tutorial for this here..
    http://www.twcenter.net/forums/showt...24#post4055624
    Last edited by bladerunner900; November 29, 2008 at 06:06 PM.

  15. #15

    Default Re: Making Unit cards with 3ds Max

    Thanks for explanation, I will give a try

  16. #16
    elvesgorndahl's Avatar Libertus
    Join Date
    Feb 2008
    Location
    Beijing, China
    Posts
    66

    Default Re: Making Unit cards with 3ds Max

    Hello, Bladerunner! It's really a nice and convenient tutorial for our newbies, hahhah~ And I made a new skin for seleucid this afternoon all followed your tutorial, that's useful indeed!
    United Federation of Chinorus Empire

  17. #17

    Default Re: Making Unit cards with 3ds Max

    Greetings elvesgorndahl.

    I’m glad you’re finding it useful. I’m not much of an artist myself. Perhaps you could show us a preview?


  18. #18
    elvesgorndahl's Avatar Libertus
    Join Date
    Feb 2008
    Location
    Beijing, China
    Posts
    66

    Icon10 Re: Making Unit cards with 3ds Max

    Greetings Bladerunner.

    As a newby, I could not use 3dsmax as well as others who are experts in this field. So the work is just simply a reskin for the Roman Praetorian Urban Cohort and makes it available for Seleucid. Thanks for your tutorials again, and also I'm learning how to mount a unit in 3dsmax from the second lesson, hah~

    Here's the image:
    United Federation of Chinorus Empire

  19. #19

    Default Re: Making Unit cards with 3ds Max

    Ooooo. Shiny!

  20. #20

    Default Re: Making Unit cards with 3ds Max

    Thanks a lot for the information on mounting units. I used to import the horse as an item, but this way it will look much better, of course.

Page 1 of 2 12 LastLast

Posting Permissions

  • You may not post new threads
  • You may not post replies
  • You may not post attachments
  • You may not edit your posts
  •