


Here are some strategy guides I've been writing for the factions that I've played so far. I hope to add more (or others could contribute!) as I play different factions. They are grouped under cultural/religious headings. There will hopefully be more in depth information about the building trees within each soon.
Note. I played all these campaign at Hard/Hard level.
Roman/Christian
Spoiler Alert, click show to read:Concilium Britanniae
Spoiler Alert, click show to read:Concilium Britanniae
This represents the Romans left behind after the Empire abandoned Britain. The start position is perilous with enemies at all points of the compass. There are only a few rebel regions to be taken and hostile neighbours are immediately adjacent. In a challenging mod overall this faction is one of the most difficult to play.
Neighbours and Diplomacy
You are scripted to remain at war with at least one of your immediate neighbours, so if you find the peace broken the very next turn after an agreement, that's why. It's war to the end. Once you've found who your eternal enemies are, your next diplomatic moves should be to try to keep any of your other neighbours from starting wars with you. You must take care not to let your outer settlements rebel because some of them will rebel to neighbouring factions and this will mean that you are automatically at war.
You have few, if any, friends in Britain, though you start off allied with the Jutes. They, however, don't provide much help. The Regnum Britorum to the south west is dementedly hostile and persistent, while the Saxons can cause big problems around Londinium. The Angli and Guened will pounce if you are weak anywhere along your eastern to northern flanks. You also need to beware the Ebrauc to the north. Trust no-one. Expect multi-front wars.
Given your perilous situation, you should really expect to fight alone, so your diplomatic efforts should be to try to foment war amongst your neighbours between themselves, especially if they have differing cultures from each other. If they are fighting each other, then they're not throwing their full weight at you.
Assimilation
Assimilation is immensely difficult. As a Roman faction you should make assimilation a gradual process and replace alien buildings in stages to avoid high garrison costs. Besides, youll need the troops in the field to deal with multiple enemies, rather than locked up in settlements. Try to use generals or family members with at least 4 stars for management as garrison commanders. This will save you a lot of heartache. As I mentioned above it is crucial not to let outlying settlements rebel unless you're happy to add yet another enemy to your lengthening list.
Economy and Recruitment
Merchants cost 200 per turn, so make sure they turn a profit. There are some good resources, especially grains, villages and horses along the river Thames west of Londinium.
The frontiers require constant vigilance and strong armies, thus your military expenses will be very high. Somehow, though, youll need to throw money at Londinium and Cairguricon in order to be able to recruit British Legionaries as soon as possible in order to stand up to the heavy infantry of your foes. Hold Londinium and Cairguricon and your economy should pay for your armies. Make rebel-held Durobrivis south east of Londinium an early target. It can also provide good money and a buffer to protect Londinium.
General Tips for reducing expenditure
You should be mindful of the costs of your agents and generals. Merchants cost 200 per turn, so make sure that they turn a profit. You may need to send them quite far from home to do so. Give them time to acquire experience. Other agents (spies, diplomats) are also expensive so forgo recruiting them unless absolutely crucial.
Managing settlements can be a headache, so try to use family members or generals with at least 4 stars for management skill. This will ease unrest and increase income. Dont adopt unless necessary, for they are extremely costly. Pay attention to small details like garrisoning troops with free upkeep.
Disbanding isnt necessarily a good idea, for the AI is relentless at times in this mod and youll need them sooner or later.
Deal with rebels promptly. They badly affect regional income. If your income suddenly drops its highly likely that rebels have popped up somewhere in your realm.
Final Remarks
It may help to mentally group regions into 4 or 5 military zones of control and maintain a strong stack in each: For example, Eastern Zone, or whatever you want to call it, with Londinium, Calleva, Durobrivis and Camolodinum together. This isnt a feature of the game, its a way I organised my regions and defence.
Your strengths are your army once you develop higher tier buildings. You have some of the best cavalry in Britain. And you have internal lines of supply within each zone of control.
Economic difficulty 8/10; military difficulty 9/10
Imperium Romanum
Spoiler Alert, click show to read:Imperium Romanum
This faction represents the declining Western Roman Empire. The start position is good with lots of space and rebel regions ready to be swallowed both east and west.
Neighbours and Diplomacy
The biggest problem is that you face two-front wars with the vast distances between. It isnt practical to march units back and forth, east and west to deal with emergencies. You will need to use local forces on each front. There is only one faction to the west, but several to the east. Simple logic dictates that the east is where you'll do most of the fighting. Your diplomatic efforts should be to reduce the number of enemies you fight simultaneously.
Llydaw to the west and the Franks to the east are your immediate neighbours. Of these the Franks are the most aggressive and numerous. They may require your strongest forces to contain, though you do start off allied to them.
Further east the Thuringians and Alemannen can cause problems later in the game, especially in the south east if they get on top of the Franks. Beware of them.
Llydaw to the west can strike hard but time and distance are on your side. Use your watch towers and spies to give warning and you should be able to contain then with a single stack. You could try to eliminate them quickly to avoid a two-front war, but this may well drain resources that you will need on the eastern front. Further, the assimilation process integral to this mod kills off rapid and massive expansion because of the unstable, rebellious populations you leave behind. Instead, try to keep them at peace while you throw resources east. Later, when you've become more powerful you can knock them out. An ally in the east is useful too and will at least reduce the number of hostile forces.
In the later campaign you may choose to reintegrate Britain back into the Empire. If the Concilium have survived, they are friendly and make good allies as long as you don't share borders. The other factions won't be so friendly.
Assimilation
The process of assimilation can be quite difficult the further east and west you expand. When you conquer a settlement of another culture you should avoid destroying and selling all the alien buildings immediately. The population will become unhappy and wont make much money each turn. Preserve the buildings and replace them in stages until the settlement has evolved into your own. This requires a smaller garrison and is probably cheaper in the long run, but access to higher tier units will take longer. The descriptions on the building browser will tell you their culture. A few buildings, such as Stables, can be sold immediately since they have no effect on happiness or money.
Economy and Recruitment
You will receive a substantial annual Legionary Payment from Rome for the first few years (every 6 turns) so you wont need to disband troops. Use that money to prepare for when it ceases.
Use your merchants to exploit the resources- especially vineyards- around Novodonium and the southern areas of the map. They seem to be more profitable there. Be mindful that they cost 200 per turn so make sure that they make a profit. I keep an assassin nearby to deal with irritating Frisian and Llydaw merchants.
Novodonium for the eastern theatre and Parisorium in the west are two of your most valuable settlements both for money and providing top quality units. Prioritise their development. A few of the Frankish settlements around Turnacum can provide excellent Germanic mercenaries, especially horse archers. However, the vast distances from these settlements to the fronts mean you must be prepared to fight with second rate local troops at times.
You can recruit artillery, which many other factions don't have. However, the long distances to travel against fast and mobile enemies might dissuade you from using any in field battles.
General Tips for reducing expenditure
You should be mindful of the costs of your agents and generals. Merchants cost 200 per turn, so make sure that they turn a profit. You may need to send them quite far from home to do so. Give them time to acquire experience. Other agents (spies, diplomats) are also expensive so forgo recruiting them unless absolutely crucial.
Managing settlements can be a headache, so try to use family members or generals with at least 4 stars for management skill. This will ease unrest and increase income. Dont adopt unless necessary, for they are extremely costly. Pay attention to small details like garrisoning troops with free upkeep.
Disbanding isnt necessarily a good idea, for the AI is relentless at times in this mod and youll need them sooner or later.
Deal with rebels promptly. They badly affect regional income. If your income suddenly drops its highly likely that rebels have popped up somewhere in your realm.
Final Remarks
Your navy is strong so it can be useful for dealing with pirates and Germanic landings along the Channel, as well as making your own raids and landings in Britain and elsewhere.
Your strengths are your economy, manpower, heavy infantry and heavy cavalry. The wide variety of good quality units available to you means you can mould and adapt your armies to counter the different fighting styles of your enemies. Space is on your side for defence, but the long frontiers can easily be penetrated by hostile forces and you will find it very difficult to defend everywhere at once.
Economic difficulty 7/10; military difficulty 6/10
Romano-British/Christian
Spoiler Alert, click show to read:Llydaw
Spoiler Alert, click show to read:reserved
Regnum Britorum
Spoiler Alert, click show to read:Regnum Britorum
This faction occupies the south-west corner of Britain, sharing a long north-eastern border with, for the most part, the Councilium, your eternal enemies. North across the Bristol Sea is the neutral Guened faction separated by a few rebel settlements. Along the Channel coast the dangerous and hostile Saxons lurk.
That aside, you have the advantage of a secure territory to expand from.Spoiler Alert, click show to read: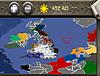
Neighbours and Diplomacy
The Councilium on the attack tend to march westward via Callleva and south west via Corinium towards Aquae Sulis. That is, if they have sufficient strength. They are surrounded by hostile factions and their survival as a major faction would be a minor miracle, so your main danger in the early years will march under a Saxon banner. As the campaign develops the Councilium will almost certainly give way to one of the Angli, Ebrauc or Guened, or some combination of these three. Of these, the Guened, and possibly the Ebrauc, may be open to friendly relations and alliances.
There are broadly four directions in which you could advance. You can strike northeast from Aqaue Sulis and take on the Councilium around Corinium. The disadvantages of this are long lines of supply and exposure on three sides to attack, along with possible border contact with neutral Guened.
The second option is to push, via the cluster of rebel settlements around the Isle of Wight (Clausentum, Venta and Seoles), onward to the Councilium-held Calleva, and then later to Londinium itself, should you be so inclined.Spoiler Alert, click show to read: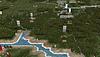
The third option is to take those afore mentioned settlements and take on the Saxons at Cissacaestre. Take the bull by the horns, so to speak.
The final option is to cross the Bristol Sea and swallow rebel-held Cairwent. Again, this brings contact with the Guened closer and war with them sooner rather than later. Besides, you would weaken your eastern front and allow the Saxons to build strength.
Assimilation
The capture of Romano-British settlements shouldnt cause too many headaches, though a general or family member with at least four stars for management will keep garrison costs down. Alien buildings should be replaced in stages to maintain order and income levels if you start taking Germanic or Gaelic settlements.
As a Romano-British faction you have the option of pursuing either barbarian settlement development or reverting to the more traditional development of your Roman forebears. Your decision effects, for example, the type of units you can recruit later in the campaign. Your settlements at the start are for the most part Romano, so that would be the most advisable direction to take. If you wish to revert to barbarism, destroy the Roman buildings and build barbarian buildings from there.
Economy and Recruitment
Your stand-out unit, available reasonably early in the campaign, is the British Legionaries unit. This solid infantry unit will help you especially if you take on the Saxons. It is available when you build the Hall of Heroes. Your capital is well developed towards this and should receive your attention as soon as possible. The Hall of Heroes also unlocks valuable cavalry and archer units, though they are expensive, so do not neglect your economy. You can recruit good, solid, balanced armies.
For a long time I found my merchants a provided a net loss (Hard campaign level) and only later did they barely cover costs trading furs near Saxon territory, after they had gained a lot of experience. I would recruit only two or three at a time, unless you want to use them actively to hunt down other factions merchants.
General Tips for Reducing Expenditure
You should be mindful of the costs of your agents and generals. Merchants cost 200 per turn, so make sure that they turn a profit. You may need to send them quite far from home to do so. Give them time to acquire experience. Other agents (spies, diplomats) are also expensive so forgo recruiting them unless absolutely crucial.
Managing settlements can be a headache, so try to use family members or generals with at least 4 stars for management skill. This will ease unrest and increase income. Dont adopt unless necessary, for they are extremely costly. Pay attention to small details like garrisoning troops with free upkeep.
Disbanding isnt necessarily a good idea, for the AI is relentless at times in this mod and youll need them sooner or later.
Deal with rebels promptly. They badly affect regional income. If your income suddenly drops its highly likely that rebels have popped up somewhere in your realm.
Final Remarks
Pay attention to notices warning of Gaelic landings on Britains western shores. You might receive a nasty surprise if you ignore them.
Be sure to protect Aquae Sulis well, for its loss would open your heartland to attack and threaten to cut off your eastern regions.
This is a moderate level faction to play, but there is some hard fighting to be had against the Saxons and the midlands factions. Your task is to prevent any of them, especially the Saxons, from getting on a roll and overwhelming you.
Your strengths are your army: good heavy and ranged cavalry, solid infantry plus various ranged and javelin infantry types.
Economic difficulty 7/10; military difficulty 6/10
Ystrad Clut
Spoiler Alert, click show to read:Ystrad Clut
The kingdom of Strathclyde was traditionally allied with the Roman Empire and acted as a bulwark against the marauding Picts to the north. In this mod the Romans no longer hold Britain, though the hostility of Pictavia has not abated.
Your first task is to unify the territories of your realm. West of Cairwenddolau is the settlement of Cairllywarch, occupied by rebels. Taking this will link your two southern regions astride Hadrians Wall with the rest of your realm further north.
Neighbours and Diplomacy
You begin the game allied with Dal Riata to the west and Goddodin to the east. Provided you take care to maintain these alliances, these should hold up and leave you secure enough to pursue your strategic aims either to the north against hostile Pictavia, south against either Ebrauc, or Guened, or even west over the sea into Ireland.
If you choose to take on Pictavia, more adventurous types may enjoy making landings further north along the west coast of Pictavia and grabbing a settlement or two before the Picts arrive in force.
Assimilation
In the regions adjacent assimilation is straightforward since they share the same Romano-British culture. You wont need to sell buildings, nor will garrisoning prove too heavy a burden. Once you push further afield into Pict, Gaelic or Germanic held regions youll have to replace buildings. Do so in stages to avoid unhappy populations and unnecessarily high garrison costs.
Economy and Recruitment
Alt Clut ,your capital, and Cairwenddolau, south of Hadrians Wall, should be developed to provide your best troops: Alt Clut for campaigning against Pictavia and Cairwenddolau for the south. Develop these well and early and you should gain relatively quick access to very good heavy infantry: Rherel and Campfwyr, as well as missle cavalry-both javelin and archer types, alongside good pila-throwing infantry types. Your good all-round armies are capable of dealing well with skirmisher factions such as Pictavia and Germanic heavy infantry factions.
General Tips for reducing expenditure
You should be mindful of the costs of your agents and generals. Merchants cost 200 per turn, so make sure that they turn a profit. You may need to send them quite far from home to do so. Give them time to acquire experience. Other agents (spies, diplomats) are also expensive so forgo recruiting them unless absolutely crucial.
Managing settlements can be a headache, so try to use family members or generals with at least 4 stars for management skill. This will ease unrest and increase income. Dont adopt unless necessary, for they are extremely costly. Pay attention to small details like garrisoning troops with free upkeep.
Disbanding isnt necessarily a good idea, for the AI is relentless at times in this mod and youll need them sooner or later.
Deal with rebels promptly. They badly affect regional income. If your income suddenly drops its highly likely that rebels have popped up somewhere in your realm.
Final Remarks
Your secure strategic situation is rich in possibilities as mentioned above. This is also a good faction to ease yourself into this mod, to get a feel for it without suffering the ordeals of a nightmare death match with multiple enemies. You can pick and choose your enemies.
Economic difficulty 4/10; military difficulty 4/10
Gododdin
Spoiler Alert, click show to read:reserved
Dal Riata
Spoiler Alert, click show to read:reserved
Ebrauc
Spoiler Alert, click show to read:Ebrauc
Formerly the Roman province of Britannia Inferior, Ebrauc is one of the Romano-British factions in this mod. Its starting position is fairly secure with rebel settlements separating it from Goddodin to the north, Ystrad Clut the northwest, Guened to the west and the Angli to the south.
Neighbours and Expansion
The early campaign is relatively straightforward. Once you expand you then run into the potentially hostile factions listed above.
If you head west, the settlement of Cairligualid, near the west coast and just south of Hadrians Wall, is rich and populous. It is occupied by Ystrad Clut at the campaign start, but their hold on it is tenuous and it may rebel soon enough. If youre not content to wait, then a short war with Ystrad Clut should sort the matter out in your favour.
If you push north there are one or two rebel settlements astride Hadrians Wall, which will need some investment in garrisons and buildings to quieten. Besides, leaving them lightly defended would invite attention from Goddodin immediately north. Goddodin are aggressive, but a couple of sharp defeats and the loss of a region or two will soon settle them down. Try to form an alliance with Pictavia and pay them to attack Goddodin and Ystrad Clut if theyre not already at war.
If you go southwest, there are several regions to take from rebels, but the Angli and Guened also have interests there and it would be difficult to defend due to the long distances for decent reinforcements to travel from your capital, Cair Ebrauc.
Guened seem especially aggressive and avaricious in this mod and will pounce on any weakly defended settlements in your south western regions.
The Angli have few paths northward due to bodies of water, so they need not be a source of anxiety, at least early in the campaign.
Occasionally, settlements outside your realm may rebel from another faction to join yours. In such cases you are automatically at war.
Your neighbours have varied fighting styles. Ystrad Clut have similar all-round armies to your own. Goddodin love their missile cavalry. Guened bring a lot of archers to the fight and the Angli use a lot of javelin infantry.
Economy and Recruitment
The economy is reasonable strong with Cair Ebrauc providing good money. It should also be developed to recruit good quality units. After you build the Hall of Heroes, you can recruit Campfwir and Rherel, amongst other good units. These can provide your armies with solid, shield wall-forming infantry: the backbone of your good, all-round armies. The same applies if you capture Cairligualid.
Your merchants can turn a profit on the islands west of Pictavia (another reason to capture Cairligualid: for its port) and along the west coast, where sheep and a few mines provide immediate profits.
Dotted through your realm are three or four forts. In each fort four units can have free upkeep, so use them to garrison your most expensive units to keep peacetime expenses down.
Assimilation
In the regions adjacent assimilation is straightforward since they share the same Romano-British culture. You wont need to sell buildings, nor will garrisoning prove too heavy a burden. Once you push further afield into Angli held regions youll have to replace buildings. Do so in stages to avoid unhappy populations and unnecessarily high garrison costs.
General Tips for reducing expenditure
You should be mindful of the costs of your agents and generals. Merchants cost 200 per turn, so make sure that they turn a profit. You may need to send them quite far from home to do so. Give them time to acquire experience. Other agents (spies, diplomats) are also expensive so forgo recruiting them unless absolutely crucial.
Managing settlements can be a headache, so try to use family members or generals with at least 4 stars for management skill. This will ease unrest and increase income. Dont adopt unless necessary, for they are extremely costly.
Pay attention to small details like garrisoning troops with free upkeep. If there are forts use them to garrison your more expensive units, where four units receive free upkeep. Family members and generals have huge upkeep, so stationing them in forts can help a lot.
Disbanding isnt necessarily a good idea, for the AI is relentless at times in this mod and youll need them sooner or later.
Deal with rebels promptly. They badly affect regional income. If your income suddenly drops its highly likely that rebels have popped up somewhere in your realm.
Final Remarks
This is an interesting faction to play because of the varied factions surrounding you, all of whom are aggressive enough to start wars with you if want to bait them (leave a border settlement lightly defended).
Oh, did I mention Cairligualid?
Economic difficulty: 6/10
Military difficulty: 6/10
Guened
Spoiler Alert, click show to read:reserved
Pict-Celtic/Celtic-Pagan
Spoiler Alert, click show to read:Pictavia
Spoiler Alert, click show to read:Pictavia
You have three potentially hostile factions to your south who have different religions to you. The start position is good, however, and there are rebel regions available for conquest. This faction gives you an early campaign choice. Its possible to be aggressive and knock one or two of your enemies off balance, if not out of the campaign entirely, with plentiful cheap units, or focus on economic and military development while expanding slowly. The first option is viable until the process of assimilation starts dragging your chain the further south you expand.
Neighbours
Your neighbours Ystrad Clut have access to good units and are probably your most dangerous early enemy, though Gododdin and Dal Riata are closer and more persistent. The local style of fighting is of skirmishing and fast, mobile units, so be adaptable and dont rely only on blocks of heavy infantry or cavalry charges to win battles.
You will need to become familiar with the routes and passes through the various mountainous regions.
Assimilation
Assimilation becomes more difficult as you expand towards and beyond Hadrians Wall, so youll need to choose between destroying everything and building from scratch, or gradually replacing alien buildings. The former requires large garrisons. Given your economy isnt especially strong you may find heavy garrisoning too burdensome, so gradual replacement may be a better option.
Economy and Recruitment
Pictavias economy and units are at best middling to good. It has a lot of fortified settlements at the start so its economy is somewhat poor. Its units are cheap, of average quality and plentiful, but you can look forward to one or two excellent higher tier units later.
Your merchants are poor, especially in the early game, so youll need to send them far south to the resources close to Londinium in order to turn a profit since they cost 200 per turn.
General Tips for reducing expenditure
You should be mindful of the costs of your agents and generals. Merchants cost 200 per turn, so make sure that they turn a profit. You may need to send them quite far from home to do so. Give them time to acquire experience. Other agents (spies, diplomats) are also expensive so forgo recruiting them unless absolutely crucial.
Managing settlements can be a headache, so try to use family members or generals with at least 4 stars for management skill. This will ease unrest and increase income. Dont adopt unless necessary, for they are extremely costly. Pay attention to small details like garrisoning troops with free upkeep.
Disbanding isnt necessarily a good idea, for the AI is relentless at times in this mod and youll need them sooner or later.
Deal with rebels promptly. They badly affect regional income. If your income suddenly drops its highly likely that rebels have popped up somewhere in your realm.
Final Remarks
Your strengths are a relatively short and defendable frontier and numerous, cheap units. However, your starting economy is weak and the further south you expand, the more difficult the assimilation process becomes.
Economic difficulty 7/10; military difficulty 7/10
Ui Neill
Spoiler Alert, click show to read:reserved
Mumhan
Spoiler Alert, click show to read:Mumhan
Mumhan represents one of the three Gaelic factions in Ireland. It occupies the southern third of Ireland and is in a relatively secure position. On the other hand, the borders with Connacht and Ui Neill are long so key points of defense need to be identified and used.
Neighbours and Diplomacy
Connacht on the west coast and Ui Neill in the north are your island neighbours. Of these, Connacht is in a perilous position, wedged between Mumhan and Ui Neill and usually falls prey to Ui Neill pretty quickly- if not to yourself soon enough.
Its possible to remain at peace with both of these factions, though it would be unwise to trust either of them if you leave any of your border settlements weakly defended. Connacht represent little danger due to their strategic weakness. It is Ui Neill against whom you will almost certainly contend for dominance of Ireland.
The border with Ui Neill is long but a bridge some distance north of your capital provides a handy defensive point, as does another bridge west of Dun Deisi, so most of the campaign manoeuvring will take place northwest of your capital around Inis Sibtonn and around the settlements along the east coast.
For expansion, one of your earliest moves should be to take the rebel settlement of Inis Subtonn, which lies northeast of Cashel- your capital- and provides a barrier to protect Cashel. Both Cashel and Inis Suntonn can be defended by a single stack at the nearby bridge, which leaves you free to push along the east coast past the bridge at Dun Deisi. In this map the bridge north of Cashel and Inis Subtonn can be seen at the top. Dun Deisi is just below screen, but its nearby bridge can be seen to the right.
Spoiler Alert, click show to read:
Assimilation
Assimilation is reasonably straightforward since all the settlements share your Gaelic culture.
Economy and Recruitment
The economy of Mumhan is fairly weak. Your capital is a castle and yet provides a great portion of your income until other settlements can be developed. The available resources of Ireland are poor, so recruiting merchants results in low profits even after they have gained experience. There is a gold resource deep in Ui Neill territory, but that is as good as it gets. Perhaps one or two merchants suffice, unless youre willing to send them to Britain or the continent. Any more than that simply drains your treasury.
Your capital provides the best units and a lot of your income, so it must receive the lions share of building funds.
The style of fighting here is of skirmishing and light-medium infantry. However, they are relatively cheap, which compensates for the weak economy. Ui Neill likes recruiting Gaelic Sea Wolves, who are an especially fast, aggressive and vicious light cavalry unit. They can do a lot of damage to your light troops on the battlefield. You will need to develop a method of dealing with them to avoid unduly heavy casualties.
General Tips for reducing expenditure
You should be mindful of the costs of your agents and generals. Merchants cost 200 per turn, so make sure that they turn a profit. You may need to send them quite far from home to do so. Give them time to acquire experience. Other agents (spies, diplomats) are also expensive so forgo recruiting them unless absolutely crucial.
Managing settlements can be a headache, so try to use family members or generals with at least 4 stars for management skill. This will ease unrest and increase income. Dont adopt unless necessary, for they are extremely costly.
Pay attention to small details like garrisoning troops with free upkeep. If there are forts use them to garrison your more expensive units, where four units receive free upkeep. Family members and generals have huge upkeep, so stationing them in forts can help a lot.
Disbanding isnt necessarily a good idea, for the AI is relentless at times in this mod and youll need them sooner or later.
Deal with rebels promptly. They badly affect regional income. If your income suddenly drops its highly likely that rebels have popped up somewhere in your realm.
Final Remarks
This is a difficult campaign because of your fragile economy. If Connacht collapses, you are on your own against Ui Neill, which is a daunting task if they hold substantially more regions than you. Not only can they swamp you with sheer weight of numbers, but every army they send into your territory affects your income. You will find it impossible to defend everywhere, so you always face the possibility of an irreversible downward spiral.
Economic difficulty 8/10
Military difficulty 8/10
Connaught
Spoiler Alert, click show to read:reserved
Germanic/Germanic-Pagan
Spoiler Alert, click show to read:Jutes
Spoiler Alert, click show to read:Jutes
Your start position is unusual with the Jutland peninsula on the continent, an island or three in the Channel, settlements in Britain and units on ships. Everything is so far apart though. But you have some awesome starting units, though replacements wont be available until you have built the required buildings. And they are incredibly expensive. Here lies the problem. Your economy is woeful. You need money fast if you want to retrain and replace those lovely soldiers.
Choices, Choices, Choices
You have a lot of options to consider at the start of your campaign. You could, of course, disband your army and hide in isolated Jutland and build from there, but that would be boring.
There are rebel settlements to the south in Jutland and one in Scandinavia worth taking, although these would divert troops from Britain (or the continent) where there are richer pickings.
Once you settle down Britain is probably where you should concentrate your main forces in order to expand from your existing settlements there. The continent is also an option for expansion, but that would spread you even further and create yet more enemies.
Economy and Recruitment
Your starting navy is powerful; use it and your wonderful starting army to help solve your money problems. Raid, attack, storm, sack, and disappear back onto your ships. At some point, though, with accumulating battlefield casualties (and debt, most likely) you wont have enough troops to continue this while holding your settlements.
After you have stopped raiding, settled down and have money, its worthwhile shipping good units from Jutland to Britain, as it will be a while before your British settlements provide good quality troops. Youll need them if the Saxons remain in the game.
Plan carefully and youll be back in the black after a few years. Before that happens, assuming you stay in Britain, youll have to deal with the Saxons, Regnum Britorum and others all the while the remnants of your army are further whittled away. The Saxons are your most persistent and dangerous enemy.
General Tips for reducing expenditure
You should be mindful of the costs of your agents and generals. Merchants cost 200 per turn, so make sure that they turn a profit. You may need to send them quite far from home to do so. Give them time to acquire experience. Other agents (spies, diplomats) are also expensive so forgo recruiting them unless absolutely crucial.
Managing settlements can be a headache, so try to use family members or generals with at least 4 stars for management skill. This will ease unrest and increase income. Dont adopt unless necessary, for they are extremely costly. Pay attention to small details like garrisoning troops with free upkeep.
Disbanding isnt necessarily a good idea, for the AI is relentless at times in this mod and youll need them sooner or later.
Deal with rebels promptly. They badly affect regional income. If your income suddenly drops its highly likely that rebels have popped up somewhere in your realm.
Assimilation
Assimilation in south east Britain is moderately difficult. In the early game it is nearly impossible to hold all the settlements that you capture in your seaborne raiding because youll have insufficient troops to garrison and raid at the same time. Destroy everything and abandon the settlements to rebels, or sell them, whatever. Just make a quick buck from them and hop back onto your ships. When you return later in the campaign youll need to build from scratch, unless a Germanic faction has occupied them in the meantime. Durobrivis, Limatae and Cantwarabryc south east of Londinium may be worth holding onto, so you may want to keep their buildings intact until later in the game when you have a stronger economy.
Final Remarks
The islands in the Channel are relatively safe and friendly and need not be heavily garrisoned. An impassable river across the south of Jutland protects you from marauding Frisians, Sahnotas and others.
Your powerful starting units and naval mobility are your strengths, as are the isolation and security of Jutland and the islands. The economy at the start and distance are your weaknesses.
Economic difficulty 9.5/10; military difficulty 8/10
Regnum Francorum
Spoiler Alert, click show to read:
Regnum Francorum
The Franks are one of the continental Germanic factions and at the start occupy a broad tongue of land around the River Meuse (west of the Rhine). The Directorate of Soissons (Imperium Romanum) are immediately west, while the Frisians, Alemannen and Thuringians are your eastern neighbours across the Rhine, all of whom are Germanic .
Neighbours and Opening Strategy
Securing the broad triangle of land between the Meuse and the Rhine should be your first priority: take from the rebels Otrolanum, Aquisgranum and Tricensimae. The Rhine and the settlements along its west bank provide a natural boundary for your eastern border.
To the south a bridge separates rebel-held Medurantium from your southern flank. This bridge provides a handy defensive position. Taking Medurantium seems to irritate the Romans a lot. It is rather exposed, so for the early campaign probably not worth the trouble. Besides a push to the southern regions of the map leaves you with absolutely enormous flanks exposed both east and west. Namur, further east along the same river, is probably worth taking, as it is not easily reached by the Romans and the eastern factions. There is only one accessible western rebel settlement, Camaracum, southwest of your capital. The Romans will probably take it before youve finished in the east.
Your relationship to the Romans is the key to your campaign. You start allied to them, so cultivate that alliance long enough to secure your eastern and southern borders. As long as the Romans are occupied with fighting Llydaw, or one of either the Alemannen or Thuringians in the vast areas south of your realm, they will treat you with respect. But, they are Romans, remember, so dont give them a sniff by leaving your western settlements lightly defended.
However, if you leave them alone for too long they will destroy Llydaw in the west. Then they will come for you. They have some of the best and most numerous troops in the mod. It would be very bad. Unless, of course, you like hanging on by your fingernails against a superpower while desperately hoping your eastern neighbours stay peaceful.
You must attack the Romans at some point to survive and expand. Timing is of the essence in your betrayal of the Romans. Jump too early and you may not have built up the strength yet to fight both the Romans and whichever faction[s] betrays you in the east. Go too late and youll encounter an opponent with no flanks to protect and a superb military machine. Youre in for a hard fight, whatever you do.
Economy and Recruitment
Your capital, Turnacum, is the most developed of your settlements and provides the richest income and best units early on. However, a few other settlements, such as Brugae on the coast, are also rich so you wont necessarily have a one-city economy. Settlements such as Tongern can also supply you with excellent mercenaries, provided you develop suitable buildings, such as the Mercenary Post and more. You can recruit superb units, a match for the Romans, given enough development in your biggest settlements.
Your merchants can find good resources, such as vineyards in the south. But the richest resources can be found deep in Germania, so its well worth exploring the far east of the map.
Overall, your economy is strong and resilient.
Assimilation
You may encounter difficulties assimilating Roman settlements. You can either destroy alien buildings and rebuild from scratch, or pursue a step by step programme of replacing them. The latter method saves garrisoning costs and preserves at least some of their income. However, the choice of units is limited and poor. Distance from your capital also makes populations unhappy. Crossing the Rhine, pushing far south or deep into Roman territory will be a challenge. A general or family member with four or more stars for management is a must for outlying settlements.
General Tips for reducing expenditure
You should be mindful of the costs of your agents and generals. Merchants cost 200 per turn, so make sure that they turn a profit. You may need to send them quite far from home to do so. Give them time to acquire experience. Other agents (spies, diplomats) are also expensive so forgo recruiting them unless absolutely crucial.
Managing settlements can be a headache, so try to use family members or generals with at least 4 stars for management skill. This will ease unrest and increase income. Dont adopt unless necessary, for they are extremely costly.
Pay attention to small details like garrisoning troops with free upkeep. If there are forts use them to garrison your more expensive units, where four units receive free upkeep. Family members and generals have huge upkeep, so stationing them in forts can help a lot.
Disbanding isnt necessarily a good idea, for the AI is relentless at times in this mod and youll need them sooner or later.
Deal with rebels promptly. They badly affect regional income. If your income suddenly drops, its highly likely that rebels have popped up somewhere in your realm.
Final Remarks
This is a fun faction to play. With excellent heavy infantry and well-rounded cavalry you can usurp the Romans and become the superpower of the continent. The temptation to overextend must be resisted, however.
Economic Difficulty 6/10
Military Difficulty 8/10
Alemannen
Spoiler Alert, click show to read:reserved
Thuringi
Spoiler Alert, click show to read:Thuringi
The Thuringians occupy a smattering of settlements on the far estern edge of the map. Three settlements, including the capital Triteburg, cling to a relatively isolated and secure mountain range. This is the beating heart of your faction.
To the south lies Idisburg. It is more than a game turn's distance, so it is exposed and vulnerable to attacks of the Allemanni from the west via their settlement of Mogontiacum. It should be held as a bulwark against them, and later used as a jumping off point for any offensives into Alemanni territory.
To the west, but just within the range of infantry marching from Gothaha, is Gaesmare. This is exposed to attacks from the Frisians and the Alemanni. It is also important as a waystation for the long, slow and dangerous march around the mountain range to your most isolated settlement, Wegeleba.
Wegeleba cannot be reached through the mountains cradling your capital. Reinforcing it requires marching three or four game turns through treacherous forests, which provide ample opportunities for AI attacks and ambushes. It requires strong defensive forces, as it is the focus of Sahnotas attacks. Its income is moderate at best, so you have a dialemma: relinguish it and save on expense and casualties; hold it and drain your resources in heavy fighting against the persistant and hostile Sahsnotas.
The Sahnotas, Frisians and Alemanni border your lands. Fighting one or two of them simultaneously is hard work; fight all three and you may find yourself overwhelmed. At the start you're at war with the Sahnotas and the Alemanni. You do not want the Frisians to join them. It might be worthwhile improving your reputation to at least 'reliable' (release prisoners, etc).
Neighbours and Battlefield Tactics
Fighting the Alemanni requires well-balanced armies, especially Faramanne Spearmen to hold the line, before sending in your Ostrogothi, Warinoz Swordsmen and various powerful lance and melee cavalry. These can be progressively recuited in your heartland settlements fairly quickly after you build the Germanic Barracks, King's Hall and Germanic King's Stronghold.
On the other hand, your struggle against the Sahsnotas will be against infantry armies. Build a Muster Field for the Faramanne Speamen and the King's Hall for strong melee infantry. However, the Sahnotas field virtually no cavalry, so here you can defeat them on the battlefield with horse archers, followed by a few lancer charges. If they besiege Wegeleba, then sally out with your cavalry and chew them up. The Germanic Warlord's Stables should give you a sufficient variety of cavalry for all your Sahnotas defeating needs.
Economy and Recruitment
The three settlements of your heartland should receive most economic development, though as mentioned above you wil need to invest in military building in Wegeleba if you intend to hold it. Your merchants can make good money from the vineyards and horses down in the southern edge of the map.
Assimilation
The process of assimilation is made easier by using leaders with at least 4 stars for management skill. The settlements west of your starting position are basically Germanic and basically won't need much rebuilding or transformation. You may not necessarily need to build their military capacity, but invest in buildings such as the German Government Centre. Alemanni and Saxon/Frisian settlements should be easy to control once you capture them.
Final Remarks
This campaign can go really well if your neighbours don't gang up on you. It can also become a bloody grind if they do. As mentained above, try to build a good reputation in order to keep the Frisians out of the fight.
Economic difficulty 5/10
Military difficulty 7.5/10
Sahsnotas
Spoiler Alert, click show to read:reserved
Frisians
Spoiler Alert, click show to read:The Frisians
This faction occupies the flat, watery region in what is now The Netherlands. The rivers and bodies of water criss-crossing the region help form an enclave of enviable security and potential economic prosperity.
Neighbours and Opening Strategy
To the east lie the Sahnotas: friendly and allied. Be sure to cultivate that alliance with tribute in order to secure your eastern flank. To the south and west are the aggressive, avaricious and numerous Franks (Regnum Francorum).
The Romans too are friendly and an alliance with them may be worthwhile later in the campaign.
One of the earliest strategic decisions you'll need to make is whether to defend or abandon your two settlements on the southern bank of the River Meuse. Before too long the Franks will act on their dark desires and attack them. Defending them will cost plenty and early in the campaign it may be worth surrendering them to concentrate on expanding eastward until you bump into the Sahnotas.
If you stay safely north of the river, the Franks will leave you alone.
When you later cross south of the river and extract well-deserved revenge on the Franks is your next strategic decision. Until then you should focus on building one of the strongest economies in the mod.
You may also need to cross to Britain in order to prevent one or two of the factions there from winning the campaign, so keep an eye on the situation there.
Also keep an eye on your ally, the Sahnotas, as they may struggle against the Alemannen and Thuringians. Make sure you don't suddenly have Alemanni or Thuringian armies pouring over your south-eastern border.
Assimilation
The process of assimilation is made easier by using leaders with at least 4 stars for management skill. The rebel settlements east of you starting position need a little patience and moderately strong garrisons to keep under control. You may not necessarily need to build their military capacity, but invest in buildings such as the German Government Centre. Frank settlements should be easy to control once you capture them.
Economy and Recruitment
Build towards the Hall of Heroes in one or two settlements near your southern border. This building gives you access to excellent troops, including the Hraefelmas infantry (madmen with horned helmets). Those guys tear other infantry to shreds and are especially useful against the infantry armies of the Franks.
Your merchants are pretty good and worth recruiting. Send them south to the vineyards, or east to the mountainous area in Thuringian territory.
You can recruit solid, varied armies, including good cavalry. Man for man the Franks can recruit better heavy infantry, but your varied units give you the edge on the battlefield. Fighting the Romans or Thuringians will provide a good challenge.
General Tips for reducing expenditure
You should be mindful of the costs of your agents and generals. Merchants cost 200 per turn, so make sure that they turn a profit. You may need to send them quite far from home to do so. Give them time to acquire experience. Other agents (spies, diplomats) are also expensive so forgo recruiting them unless absolutely crucial.
Managing settlements can be a headache, so try to use family members or generals with at least 4 stars for management skill. This will ease unrest and increase income. Dont adopt unless necessary, for they are extremely costly.
Pay attention to small details like garrisoning troops with free upkeep. If there are forts use them to garrison your more expensive units, where four units receive free upkeep. Family members and generals have huge upkeep, so stationing them in forts can help a lot.
Disbanding isnt necessarily a good idea, for the AI is relentless at times in this mod and youll need them sooner or later.
Deal with rebels promptly. They badly affect regional income. If your income suddenly drops, its highly likely that rebels have popped up somewhere in your realm.
Final Remarks
Not the most difficult faction to play because of it defensible terrain. Just be careful not to let the Franks overwhelm the Romans before you attack them. Overcoming the Franks is your highest priority. You should also be prepared to intervene in other conflicts in Britain in order to ensure your own campaign victory.
Economic difficulty 5/10
Military difficulty 7/10
SaxonsSpoiler Alert, click show to read:
Saxons
Neighbours and Strategic Choices
At the start you occupy a few settlements along the Channel coast and one north east of Londinium (Ithancaeastre). The cluster of along the Channel coast lies between Regnum Britorum to the west, the Concilium to the north east and the Jutes to the east, who also occupy nearby Wihtgaresburgh (the Isle of Wight).
Your first strategic decision is whether to expand from your Channel settlements, or from Ithancaeastre. Whichever way you choose, you will need to concentrate sufficient forces from your various settlements. This means your first move should be to build a ship. If you wish to advance from the south coast, then build a ship at Ithancaeastre to ferry troops from there. Take care to avoid any Jute fleets lurking around the Kent coast. If you do this you will have to rebuild Ithancaestre's garrison as soon as possible, even though it seems to attract fewer than usual enemy attacks.
Likewise, build a ship on the south coast to ferry troops north if you wish to expand from Ithancaestre.
Of these two choices, expanding from the Channel settlements makes more sense, since Regnum Britorum and the Concilium will attack your poorly defended settlements along the coast if you ship your best units away to Ithancaestre.
To the east lies rebel-held Anderitum between yourself and the Jutes. Leave it be. Taking it only invites heavy Jute attacks, which necessitate a strong and costly garrison. The costs of the garrison and battle casualties far outweigh any income from the settlement. Early in the campaign your economy is very weak and you will struggle to pay for sufficient troops to hold it, let alone expand elsewhere or fend off the Concilium and Regnum Britorum at the same time.
This means Cissacaestre, immediately west of your Channel settlements, is your obvious first target, followed by nearby Seoles. Thereafter you run into either Regnum Britorum or Concilium-held Venta. If you manage to take Venta (by now your starting forces will be somewhat diminished by casualties and garrisoning), you will have a difficult time defending it, exposed as it is to both hostile factions east and west. Perhaps it is best left alone early in your campaign, or pillaged and abandoned.
The island of Wihtgaresburgh is also an attractive target. As an island and with Germanic culture and buildings it is relatively secure and cheap to garrison, though beware of Jute landings.
Expansion from Ithancaeastre is also an option. Londinium beckons, and the Angli -your allies-can protect your northern flank. However, with your small starting armies and weak economy, this virtually means abandoning your Channel settlements to the predations of the Concilium and Regnum Britorum. You simply won't have the resources to expand from Ithancaestre and defend the south coast at the same time.
Economy and Recruitment
As soon as possible build the Thingatio Harimas Mittilaesto in one or two settlements, which allows recruitment of Britannic Frankisca Mercenaries and Mercenary Bowmen. Both these units are invaluable until much later when you can finally recruit higher tier units. The Frankiscas are especially valuable as they are solid in defence, can form shieldwalls and throw axes.
You have a steep challenge ahead of you building a strong economy. Unless you somehow expand beyond your coastal settlements and hold on to your conquests, you are restricted to a few settlements while surrounded on three sides by hostile and aggressive factions.
It's a good idea to build a fleet strong enough to deal with frequent Brythonic attempts to blockade your ports. If you're lucky you might also intercept a Jute fleet or two full of reinforcements, which you can then gleefully send to the bottom of the sea.
You cannot recruit cavalry until the right buildings have been built. This can take some time, so be prepared to fight without them and adjust your battlefield tactics accordingly. This also underlines the importance of recruiting Mercenary Bowmen as soon as possible.
Assimilation
You may encounter difficulties assimilating Romano-British settlements. You can either destroy alien buildings and rebuild from scratch, or pursue a step by step programme of replacing them. The latter method saves garrisoning costs and preserves at least some of their income. However, the choice of units is limited and poor.
General Tips for reducing expenditure
You should be mindful of the costs of your agents and generals. Merchants cost 200 per turn, so make sure that they turn a profit. You may need to send them quite far from home to do so. Give them time to acquire experience. Other agents (spies, diplomats) are also expensive so forgo recruiting them unless absolutely crucial.
Managing settlements can be a headache, so try to use family members or generals with at least 4 stars for management skill. This will ease unrest and increase income. Dont adopt unless necessary, for they are extremely costly.
Pay attention to small details like garrisoning troops with free upkeep. If there are forts use them to garrison your more expensive units, where four units receive free upkeep. Family members and generals have huge upkeep, so stationing them in forts can help a lot.
Disbanding isnt necessarily a good idea, for the AI is relentless at times in this mod and youll need them sooner or later.
Deal with rebels promptly. They badly affect regional income. If your income suddenly drops, its highly likely that rebels have popped up somewhere in your realm.
Final Remarks
This faction is a challenge. Your have a poor starting economy, a moderate starting army and few settlements. Expanding from your beachheads is difficult. You also lack cavalry on the battlefield for the early campaign. Once the heavy infantry from your starting armies have been used up, you're stuck with medium infantry at best until your building program is quite advanced.
Economic Difficulty 8/10
Military Difficulty 8/10
Angli
Spoiler Alert, click show to read:
The Angli
Neighbours and Opening Strategy
At the start you occupy a sprinking of settlements on the mid-east coast of Britain. Almost all of them are castles, so your economy, along with your starting forces, is quite weak.
Your northernmost settlement, the castle Burh, borders Ebrauc and is rather isolated. You need ships to keep lines of communication open with it. You will need to decide if it is worth keeping should Ebrauc decide to attack it.
Your southern regions border the hostile Concilium and the friendly, allied Saxons.
Your weak economy rules out sitting back and taking your time to develop. You need to get moving. From your capital, Brancaestre, head west to the rebel settlement of Wisebece. From there, head north west to Tiggocobauc. Taking these two towns will expand your economy enough to start a serious building program in your capital for higher tier units and to develop your economy in Venta Icenorum and Beordericesworth, which are your only starting towns.
From Peartingas you can head north west to take Colonia Lindum, or south west for Causennae. Both of these are rebel towns and quite important for your strategic safety, since Ebrauc and later Guened will expand towards you. These are rich towns and also provide a buffer.
Economy and Recruitment
As mentioned above, you will need to take several rebel-held towns in order to build your economy sufficiently to pay for the military development of Branceastre. Your starting units are weak and few in number. You need to build strong enough forces quickly to withstand your more numerous neighbours.
You have infantry based armies, so don't neglect development of archer buildings so that you can stand up to armies with cavalry. Later you can develop facilities to recruit light cavalry in towna and castles.
It's your heavy infantry in combination with pila-throwing light and medium infantry which should give you an edge on the battlefield. These classes of units can be recruited after you build the Hall of Heroes in castles.
Assimilation
When you expand to capture towns like Colonia Lindum you need to choose between outright destroying the Romano-British building within them, or replacing them in stages. Just bear in mind that the more buildings you destroy, the less income you receive and the greater the cost of garrisoning. The flipside is that replacing the buildings in stages is a drawn out process and may in the long run cost more.
General Tips for reducing expenditure
You should be mindful of the costs of your agents and generals. Merchants cost 200 per turn, so make sure that they turn a profit. You may need to send them quite far from home to do so. Give them time to acquire experience. Other agents (spies, diplomats) are also expensive so forgo recruiting them unless absolutely crucial.
Managing settlements can be a headache, so try to use family members or generals with at least 4 stars for management skill. This will ease unrest and increase income. Dont adopt unless necessary, for they are extremely costly. Pay attention to small details like garrisoning troops with free upkeep.
Disbanding isnt necessarily a good idea, for the AI is relentless at times in this mod and youll need them sooner or later.
Deal with rebels promptly. They badly affect regional income. If your income suddenly drops its highly likely that rebels have popped up somewhere in your realm.
Final Remarks
It's important not to sit back and await developments with this faction. You would risk falling a long way behind economically and militarily, leaving you easy prey for the predations of your neighbouring factions.
Just be wary of over-extending your forces in order to capture rebel settlements early in the campaign.
Economic difficulty 8/10
Military difficulty 8/10
WIP I Will continue the branching and correcting each of the cultures tech trees
Theramines, maybe a tech flow chart very soon off of this?
You should first build the Grain Exchange Market, which allows you to construct major buildings
The Grain Exchange Market allows the construction of 7 important building branches:WIP
Spoiler Alert, click show to read:
Roman Culture: Western Roman Empire(Soissons) Councilium Britanniae
The Grain Exchange Market :
- Roman Settlement-Governors Villa (1st level Roman). This allows the recruitment of higher tier units.
- Armory, then you can build the Chieftain Hall (first level Barbarian) This Allows the recruitment of higher tier units.
- Craftsmen, then you can build the Treasure Chest (Warlords Booty), then 1st level of the Kings Stronghold. These improve your economy and units.
- Ports - first level. Improves your economy.
- River ports - first level. Again, your economy.
- Training Gyrus (for cavalry) - first level needed to build for Horse Breeding (first level stables).
- Farms (Farming).
Romano British Culture: Guened Alt Clut Gododdin Ebrauc Dumnonia Llydaw:
The Grain Exchange Market :
- Roman Settlement-Governors Villa (1st level Roman). This allows the recruitment of higher tier units.
- Armory, then you can build the Chieftain Hall (first level Barbarian), or Governors Villa (2nd level Roman). These allow recruitment of higher tier units.
- Craftsmen, then you can build the Treasure Chest (Warlords Booty), then 1st level of the Kings Stronghold. These improve your economy and units.
- Ports - first level. Improves your economy.
- River ports - first level. Again, your economy.
- Training Gyrus (for cavalry) - first level needed to build for Horse Breeding (first level stables).
- Farms (Farming).
Gaelic Culture Mumainha Uí Néill Connacht Dál Riada Pictavia:
The Grain Exchange Market :
- Armory, then you can build the Chieftain Hall (first level Barbarian), or Governors Villa (2nd level Roman). These allow recruitment of higher tier units.
- Craftsmen, then you can build the Treasure Chest (Warlords Booty), then 1st level of the Kings Stronghold. These improve your economy and units.
- Ports - first level. Improves your economy.
- River ports - first level. Again, your economy.
- Training Gyrus (for cavalry) - first level needed to build for Horse Breeding (first level stables).
- Farms (Farming).
Germanic Culture: Ængla Saxons Franks(Merovingians) Alemanni Sahson Ēotenas Thuringians Frêsland:
The Grain Exchange Market :
- Armory, then you can build the Chieftain Hall (first level Barbarian), or Governors Villa (2nd level Roman). These allow recruitment of higher tier units.
- Craftsmen, then you can build the Treasure Chest (Warlords Booty), then 1st level of the Kings Stronghold. These improve your economy and units.
- Ports - first level. Improves your economy.
- River ports - first level. Again, your economy.
- Training Gyrus (for cavalry) - first level needed to build for Horse Breeding (first level stables).
- Farms (Farming).

 Reply With Quote


