The Uniform Creation Tutorial
This tutorial, created on request by a fellow TWC member, will feature the basic steps required to assign a uniform to a unit, to edit the uniform, and finally to edit the textures of the variant (uniform) parts.
The tutorial will be broken down into four sections; it currently features the two first, but more are coming:
I. Introduction (done)
II. Giving a unit a uniform (done)
III. Assigning parts to the uniform
IV. Editing textures
I. Introduction
This tutorial will give a basic look on how to create properuniforms for units in N:TW. It requires basic knowledge on how to handle the PFM, how to create a unit (without a uniform), and, of course, how to handle an image editing program, such as GIMP.
Required Tools
For the sake of simplicity, I have below provided links to the various tools you will need. I am using GIMP, an open-source, free, and, most importantly, easy-to-handle image editor that does
precisely what we want it to do.
PFM 1.5.9 - this is a tool you should be familiar with, since it is absolutely necessary in almost every area of N:TW modding.
http://www.twcenter.net/forums/showthread.php?t=346400
Modmanager - a simple tool used for enabling and disabling .packs in your data folder, meaning that you won't have to constantly trot off to the scripts folder every time you want to test new .packs.
http://www.twcenter.net/forums/showthread.php?t=344757
GIMP - GIMP is an open-source, free, image editor. It's not as complete as Photoshop, but works fine when editing textures.
http://www.gimp.org/
GIMP .DDS Plugin - Fourth Part Only - .dds is the format used for N:TW and E:TW unit textures. This plugin (installation instructions provided with the download) will enable you to open .dds files in GIMP.
http://code.google.com/p/gimp-dds/
Photoshop nVidia .DDS Plugin - Fourth Part Only - as said above, .dds is a format that you will often work with while editing uniforms. This plugin will enable you to open .dds files in Photoshop.
http://developer.nvidia.com/object/p...s_plugins.html
II. Giving a Unit a Uniform
In this step, we'll take a look at how to assign a uniform to a unit. This is the simplest part, and involves only a few, quick steps.
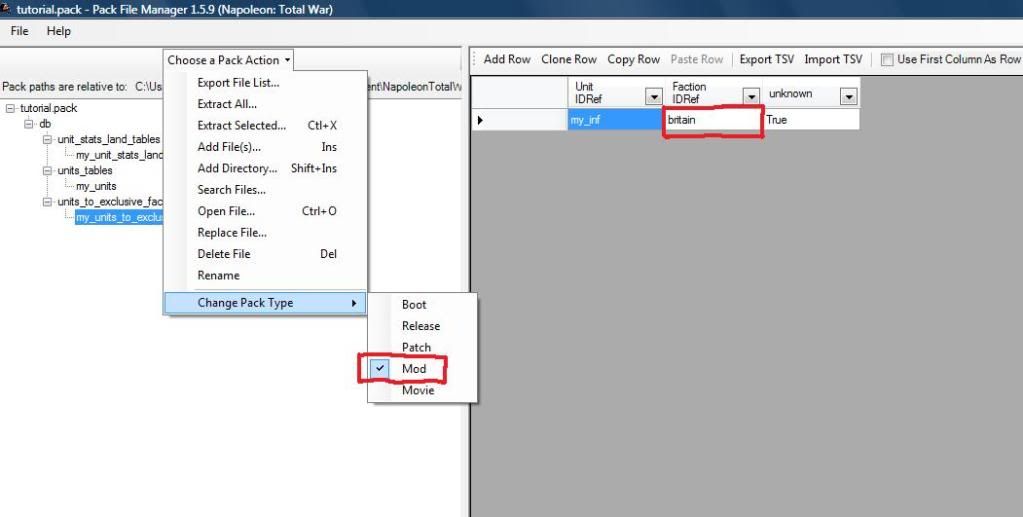
1. Create a unit with the appropriate entries in the unit_stats_land, units, and units_to_exclusive_faction_permissions tables. In the latter, remember which faction(s) you assign the unit to, since this will become important later.
Note how this .pack has been saved in the "mod" format. This is so that you can easily turn it on/off with Modmanager. The only .packs that require saving in the "movie" format are those that contain localization files, which is not the case with this .pack.
2. Now it's time to retrieve the files we need: all the relevant .packs are found in
C:\Program Files\Steam\SteamApps\common\napoleon total war\data
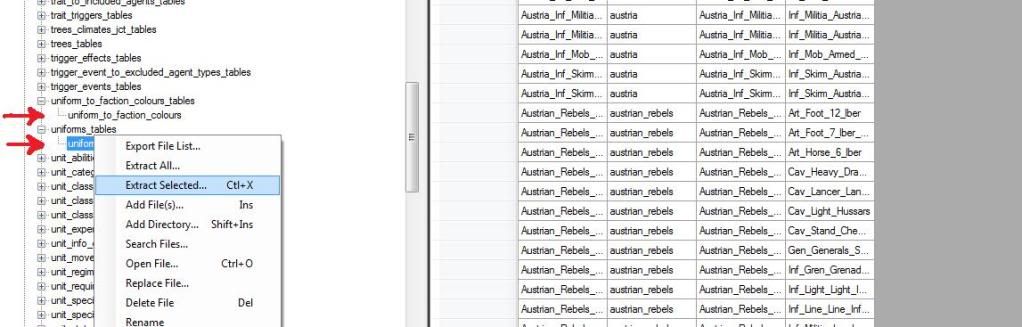
First off, we need two DB tables that link our unit (my_inf in this case) to a uniform, and we also need a table that gives the uniform of our unit a colour theme. The uniforms table does the first. Extract the uniforms table to the directory of your mod .pack, along with the uniforms_to_faction_colours table.
NOTE: the uniforms_to_faction_colours table isn't actually necessary when giving a uniform to a unit. Without it, the basic faction colours are simply loaded on top of the uniform.
Secondly, we need to bring along a few .unit_variant files to base our unit on. The .unit_variant files specify which parts make up a uniform.
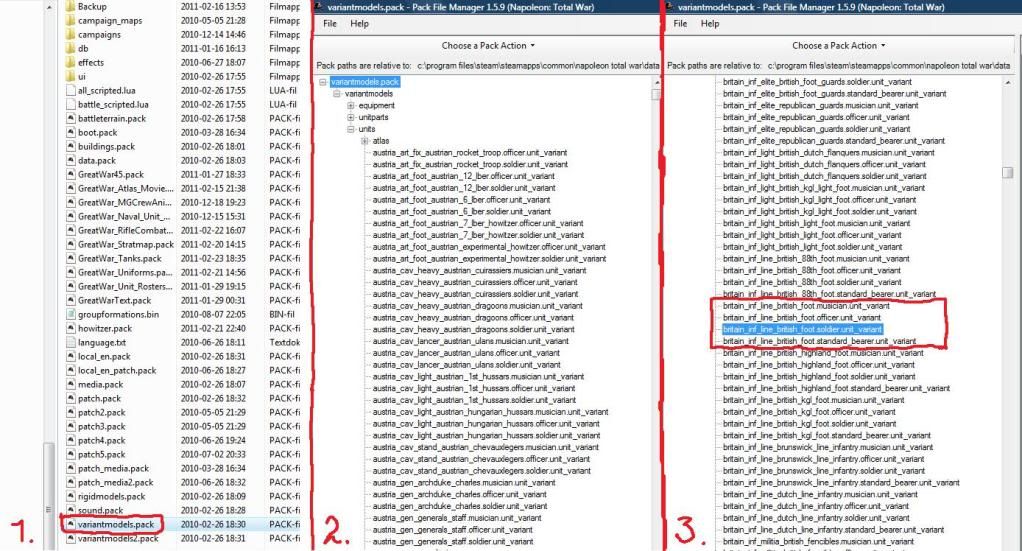
They come in a range of varieties, including .musician.unit_variant (the musician's uniform), .officer.unit_variant (the officer's uniform), .soldier.unit_variant (the average soldier's uniform) and .standard_beared.unit_variant (the standard bearer's uniform). These files are openeable with PFM, give them a quick glance, and note how each directory (hats, legs, torsos, etc.) contains several rows - these are the variations within a unit - and each row has model, and texture, file path entries. For now, let's simply extract the variants we need for our unit: since it actually does have a standard bearer, a musician, some soldiers and an officer (adjustable in the unit_stats_land, although both of the latter are necessary), all four different .unit_variant types are needed.
NOTE: try to extract .unit_variant files from the same unit (in the picture below, inf_line_british_foot, that is, the average British Foot Infantry). Unless you want to make things more complicated for yourself than necessary, do not extract .unit_variants with different prefixes (austria_inf_[...], britain_cav_[...], etc.), for reasons that will be explained later.
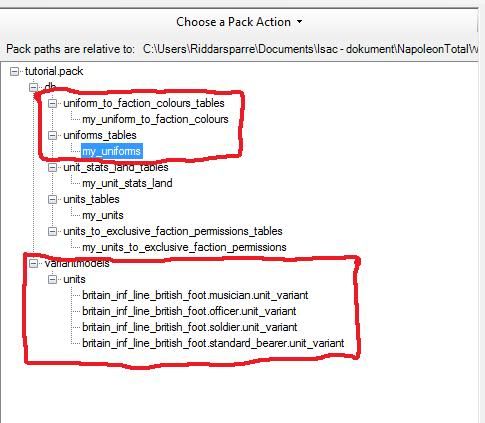
3. We now have all the files we need extracted. It is thus time to add them to the mod .pack. Add all the files you extracted to your pack, so that it looks something like this:
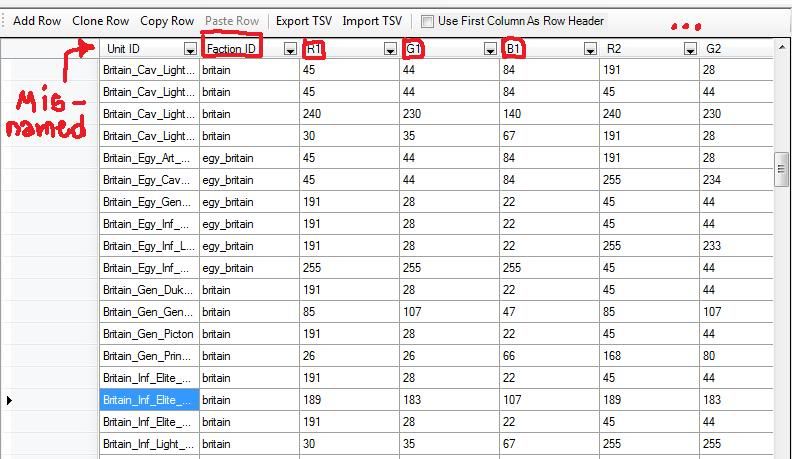
4. Now take a look at the uniforms_table. It should appear like this:
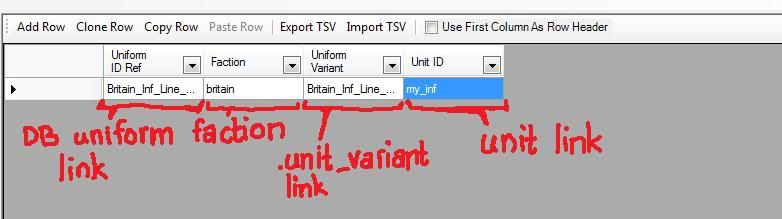
The first column is the Uniform ID Reference. The entry here is only used within the DB tables, similar to how the Projectile ID Ref of the unit_stats_land table is used as a reference in the projectiles_table, and so forth. We will be using this entry later. The second column is the Faction ID. It specifies for which faction a certain .unit_variant file is loaded. Therefore, if we were to allow the my_inf unit for both the French and British, we could actually give it different uniforms depending on factions! This is how generic infantry for the various minor factions in vanilla N:TW all have so different uniforms, even though the unit is, in fact, the same.
The third column (named 'uniform variant') is the link to the .unit_variant file itself, while the fourth column is the ID of the unit, in this case, it should be my_inf.
For the sake of making the first stage of the tutorial simple, we'll go ahead and delete all entries except the one that links to the .unit_variant we imported into the .pack. In this example, that would be the Britain_Inf_Line_British_Foot (variant) / Inf_Line_British_Foot (unit) entry. We rename the unit ID to 'my_unit': our soldiers have now been linked to a uniform, namely that of the vanilla Foot infantry:
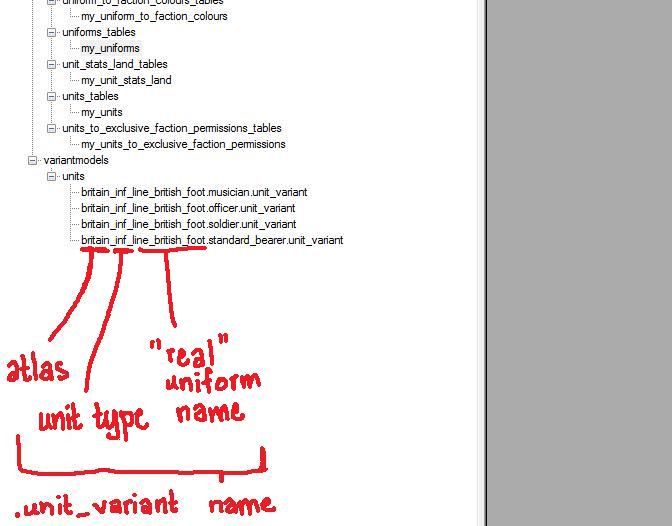
5. Since we might not want the British Foot infantry to share the same uniform as our my_inf unit, we'll have to 'create' a new .unit_variant and link it to the my_inf unit in the uniforms table. Since we can't save in the .unit_variant format, the simplest way to go about this is to rename the existing, imported .unit_variant files to something new. Before we can do this, however, we need to take into consideration the way .unit_variant naming works.
In the example, we've taken a look at...
britain_inf_line_british_foot.soldier.unit_variant
Only the text before the first 'dot' (bold) is used in the uniforms table, but it might still be a good idea to keep track on which type of .unit_variant you're actually editing (common soldiers all wearing drummer uniforms would look somewhat strange).
'britain_' (blue) is in fact a prefix. It declares which atlas file the .unit_variant belongs to. We'll delve deeper into atlas files later, but for now, the most important thing to know is that every .unit_variant file needs an appropriate such atlas prefix. Check the uniforms table for these; and note how the atlas files are named after which faction they belong to (france_, austria_, and so forth).
Surprisingly, 'Inf_' (red) is also a prefix. It denotes the type of unit involved, ranging from Art_, to Cav_ and Inf_. Failing to include this prefix will make the game load the weapon and equipment atlas instead, turning your infantry into a texture mayhem.
'line_british_foot' (green) is the 'real' name of the .unit_variant, and may be edited into whatever suits you best.
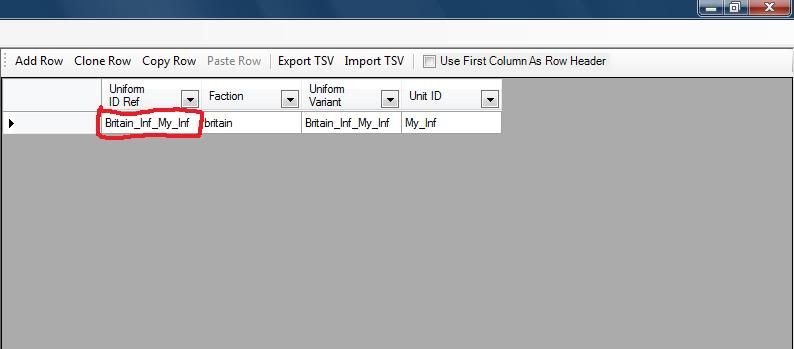
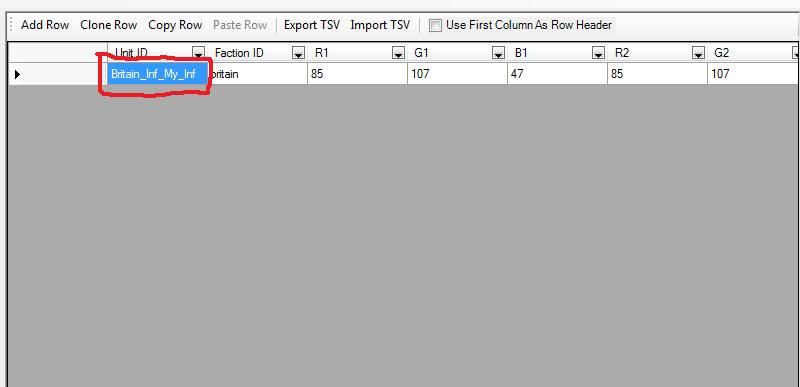
In this case, I've named the .unit_variant files to britain_inf_my_inf[...], keeping the current atlas and unit type prefixes. Note how you also have to edit the uniforms table's link to the .unit_variant file:
Renamed, and link edited.
NOTE: Between steps 4-5 I decided to capitalize the initial letters in the name of the unit (from my_inf to My_Inf). As long as all entries are the same in this respect (so that the unit name is spelled exactly the same way in unit_stats_land as in the uniforms table), capitalization of initial letters does not matter.
6. If we want to give the uniform some new colours, we need to give it another Uniform ID. Simply change the uniforms table's Uniform ID Ref to something appropriate, prefertably to the same name as the Uniform Variant entry (Britain_inf_my_inf), like below:
7. Now off to the uniform_to_faction_colours table:
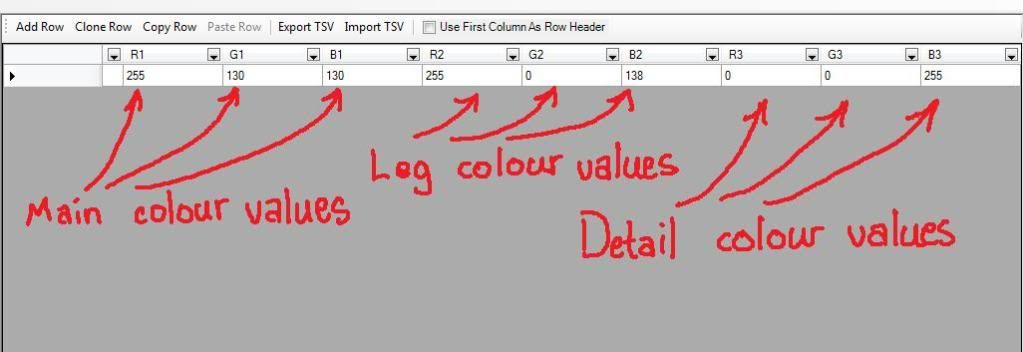
The uniform_to_faction_colours table defines the colours of a unit's main, leg, and detail uniform colour, in the RGB format. The first set of colour values (R1, G1, B1) is for the main colour, the second set (R2, G2, B2) is for the leg colour, and, finally, the third set (R3, G3, B3) determines the detail colour.
The first column of the table is actually misnamed - the PFM says 'Unit ID' - in fact, it's the Uniform ID Ref, linking a uniform to its colours.
The second column determines for which faction a specific set of colours are loaded: similar to how the uniforms table worked, this means that we can give a unit different uniform colours depending on which country it is recruited from, while keeping the uniform itself (hats, legs, torsos etc.).
Rename an entry of choice in the first column of the table to the same Uniform ID Ref that you used in the uniforms table, and delete the rest of the rows, like below:
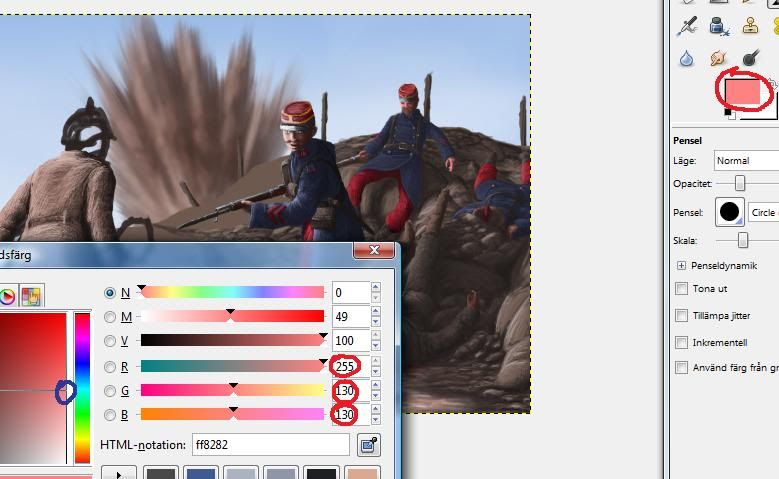
8. Since it's hard to know exactly which RGB combinations correspond to a specific colour, the best option is often to start up GIMP, and open the colour selection panel. You do this by left-clicking the palette (Photoshop works similarily).
The values you are looking for appear to the right of the colour selection field. This makes it relatively easy to pick a colour that looks good (in this case silly) and get the proper values for it. Note, however, that map lighting in N:TW can make colours look very odd, this is especially the case with Grassy Flatlands, and other, darker, maps. Homestead is a well-lit map suitable for colour testing.
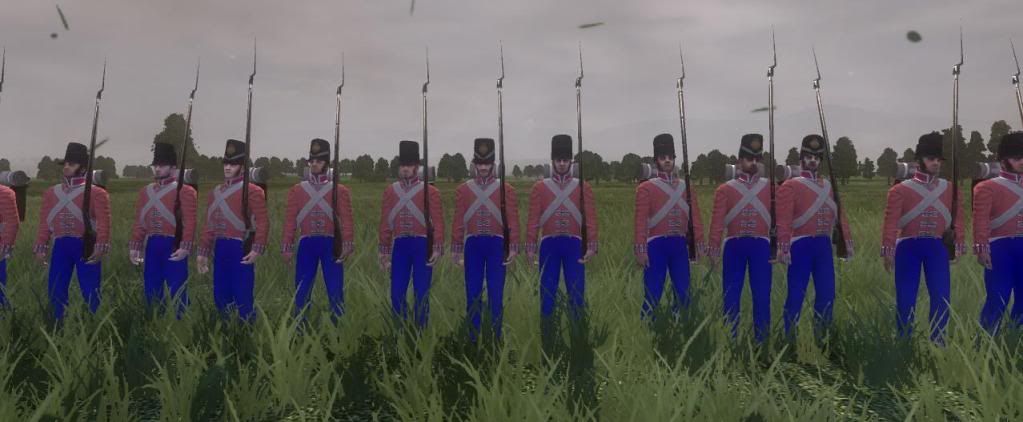
9. Enter the colour values you retrieved from your image editor, I chose some odd (but noticeable) colours.
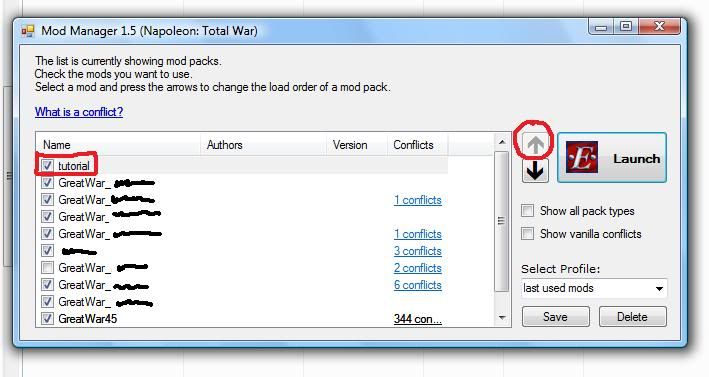
10. Finally, save the .pack, and copy it into your data folder. Run Modmanager, tick your mod file (here named tutorial.pack), move it up above any other mod files with the arrows to the right, and launch.
The result we recieve:
The first two parts of this tutorial are now over. I'll continue working on the third and fourth parts, but for now, please feel free to point out any fallacies that I may have made here, and ask questions if there's something you don't understand. 
Thank You,
Aanker
Also, below is the first .pack (inside the .zip) attached, for your viewing pleasure:


")


 Reply With Quote


")


")
")


")


 Though tbh, if the later includes a description of how to add new textures to the atlas, I would be more than glad.


")


