Page 1 of 7 1234567 LastLast
Results 1 to 20 of 137

Thread: LESSONS 3 and 4 (COMBINED): NAVIGATING, EDITING and PUBLISHING in MOVIE MAKER

  1. #1
    Nanny de Bodemloze's Avatar Treason is just dates
    Artifex

    Join Date
    Nov 2009
    Location
    Canada
    Posts
    2,753

    Default LESSONS 3 and 4 (COMBINED): NAVIGATING, EDITING and PUBLISHING in MOVIE MAKER

    LESSONS 3 and 4 (COMBINED): NAVIGATING, EDITING and PUBLISHING in MOVIE MAKER
    Spoiler Alert, click show to read: 


    The bulk of this lesson is presented in 3 instructional videos that have been produced.
    A http://www.youtube.com/watch?v=CEXJXaGGnpg
    B http://www.youtube.com/watch?v=Apk3ju-6ZCE
    C http://www.youtube.com/watch?v=5blcKRHJt7E

    These videos will :

    • orient you in MM and MM basics;
    • show you basic editing;
    • demonstrate how to apply effects, transitions and text;
    • show you how to publish/render your video;
    • provide some troubleshooting tips for rendering; and
    • demonstrate how to upload your draft video to YouTube

    We suggest watching these teaching vids in FULL SCREEN at HD resolution.
    Your version of MM may differ than what you see in the video, but the differences are minor (with the exception of the Live! version that comes with Windows 7)

    EDIT: unfortunately, in the vids, you are unable to see the contents of my preview screen...just one more step towards tearing down the illusion that I actually know what I'm doing here! - nanny

    Additional TIPS and NOTES for This Lesson

    • First, read (and apply if you wish) Lewis' tips on effects. Take particular note of PART II (I refer to it as the "Lewis Screen Fix" in the video), that describes a very effective technique for hiding the HUD and UI around your screen.

    Spoiler Alert, click show to read: 


    Part I: How to add custom transitions, effects and titles
    Spoiler Alert, click show to read: 


    How to add custom transitions, effects and titles

    Alphabetical ordered lists of custom addons for Movie Maker
    - Custom transitions, effects and titles for XP
    - Custom transitions, effects and titles for Vista and Windows 7

    Custom transitions, effects and titles can certainly increase the amount of options given to you when using MM to make movies. The program itself comes with some rather limited and basic transitions, effects and titles, so the ability to download and use new ones is very useful by giving the user far more freedom and choice during their work.

    This short tutorial will show you how to implement custom addons into Windows Movie Maker.

    Occasionally, these files kindly come with installers such as Blaine's addons. His work is great, incredibly useful and easy to install. It's quite self-explanatory as you simply run the installer like any other installation process, turn on Movie Maker and find the newly installed effects. Try it for yourself!

    However, the majority of the addons usually have to be manually installed. For this tutorial, we will be using 18 Additional 3D Ripple effects by TheOnePb.


    1. Firstly, go to C:\Program Files\Movie Maker\Shared and see if you have a folder called AddOnTFX. If you don't, create one.

    Spoiler Alert, click show to read: 


    2. Open notepad and copy and paste the following code into the notepad:

    Note: This is done using Vista, XP is exactly the same but uses different code. You can find a list of codes here for XP, I do not believe this one for this same addon of new ripple effects, although using another code will have exactly the same results. You can find new codes here
    Spoiler Alert, click show to read: 
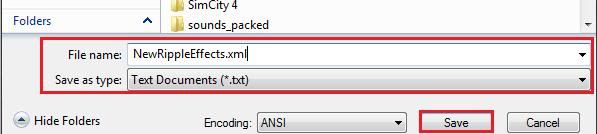
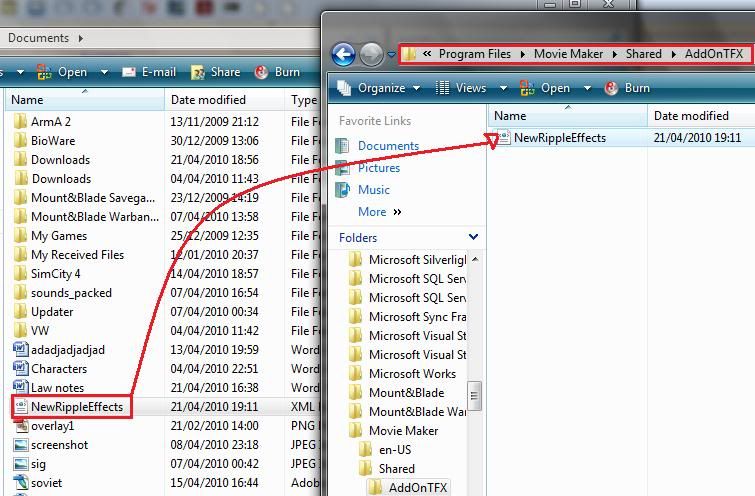
    <!-- This XML for Windows Moviemaker 6.0 Vista installs 18 additional 3D Ripple effects for you.
    This XML is made by TheOnePb. Please use this webpage with sharing: http://www.windowsmoviemakers.net/Fo...?PostID=181129
    Webpage used for making these effects: http://msdn.microsoft.com/en-us/library/bb288339(VS.85).aspx
    Please share your additional effects on http://www.windowsmoviemakers.net/Forums/
    Happy editing! [Last update 08/2008] -->

    <TransitionsAndEffects Version="2.8">
    <Effects>
    <EffectDLL guid="TFX">
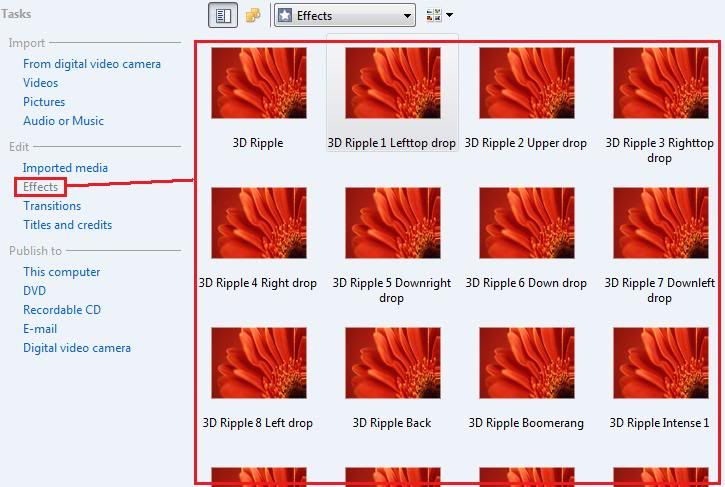
    <Effect name="3D Ripple Back" iconid="0" guid="3D Ripple Back" comment="3D Ripple Back by TheOnePb" shadermodel="2">
    <Param name="Animation" value="FX" />
    <Param name="FXFile" value="Parity.fx" />
    <Param name="Technique" value="Ripple" />
    <Semantics>
    <WaveControls evaluation="Linear" type="float2">
    <Point time="0.0" value="0.0,1.0"/>
    <Point time="1.0" value="1.0,0.0"/>
    </WaveControls>
    <WaveCenter evaluation="Step" type="float2">
    <Point time="0.0" value="0.5,0.5"/>
    </WaveCenter>
    <Frequency value="4.0" type="float">
    </Frequency>
    <Speed value="9.5" type="float">
    </Speed>
    <Height value="0.125" type="float">
    </Height>
    </Semantics>
    </Effect>
    <Effect name="3D Ripple Relax 1" iconid="0" guid="3D Ripple Relax 1" comment="3D Ripple Relax 1 by TheOnePb" shadermodel="2">
    <Param name="Animation" value="FX" />
    <Param name="FXFile" value="Parity.fx" />
    <Param name="Technique" value="Ripple" />
    <Semantics>
    <WaveControls evaluation="Linear" type="float2">
    <Point time="0.0" value="1.0,0.0"/>
    <Point time="1.0" value="0.0,1.0"/>
    </WaveControls>
    <WaveCenter evaluation="Step" type="float2">
    <Point time="0.0" value="0.5,0.5"/>
    </WaveCenter>
    <Frequency value="4.0" type="float">
    </Frequency>
    <Speed value="5.0" type="float">
    </Speed>
    <Height value="0.125" type="float">
    </Height>
    </Semantics>
    </Effect>
    <Effect name="3D Ripple Relax 2" iconid="0" guid="3D Ripple Relax 2" comment="3D Ripple Relax 2 by TheOnePb" shadermodel="2">
    <Param name="Animation" value="FX" />
    <Param name="FXFile" value="Parity.fx" />
    <Param name="Technique" value="Ripple" />
    <Semantics>
    <WaveControls evaluation="Linear" type="float2">
    <Point time="0.0" value="1.0,0.0"/>
    <Point time="1.0" value="0.0,1.0"/>
    </WaveControls>
    <WaveCenter evaluation="Step" type="float2">
    <Point time="0.0" value="0.5,0.5"/>
    </WaveCenter>
    <Frequency value="4.0" type="float">
    </Frequency>
    <Speed value="2.5" type="float">
    </Speed>
    <Height value="0.125" type="float">
    </Height>
    </Semantics>
    </Effect>
    <Effect name="3D Ripple Intense 1" iconid="0" guid="3D Ripple Intense 1" comment="3D Ripple Intense 1 by TheOnePb" shadermodel="2">
    <Param name="Animation" value="FX" />
    <Param name="FXFile" value="Parity.fx" />
    <Param name="Technique" value="Ripple" />
    <Semantics>
    <WaveControls evaluation="Linear" type="float2">
    <Point time="0.0" value="1.0,0.0"/>
    <Point time="1.0" value="0.0,1.0"/>
    </WaveControls>
    <WaveCenter evaluation="Step" type="float2">
    <Point time="0.0" value="0.5,0.5"/>
    </WaveCenter>
    <Frequency value="1.0" type="float">
    </Frequency>
    <Speed value="9.5" type="float">
    </Speed>
    <Height value="0.125" type="float">
    </Height>
    </Semantics>
    </Effect>
    <Effect name="3D Ripple Intense 2.5" iconid="0" guid="3D Ripple Intense 2.5" comment="3D Ripple Intense 2.5 by TheOnePb" shadermodel="2">
    <Param name="Animation" value="FX" />
    <Param name="FXFile" value="Parity.fx" />
    <Param name="Technique" value="Ripple" />
    <Semantics>
    <WaveControls evaluation="Linear" type="float2">
    <Point time="0.0" value="1.0,0.0"/>
    <Point time="1.0" value="0.0,1.0"/>
    </WaveControls>
    <WaveCenter evaluation="Step" type="float2">
    <Point time="0.0" value="0.5,0.5"/>
    </WaveCenter>
    <Frequency value="2.5" type="float">
    </Frequency>
    <Speed value="9.5" type="float">
    </Speed>
    <Height value="0.125" type="float">
    </Height>
    </Semantics>
    </Effect>
    <Effect name="3D Ripple Intense 5.5" iconid="0" guid="3D Ripple Intense 5.5" comment="3D Ripple Intense 5.5 by TheOnePb" shadermodel="2">
    <Param name="Animation" value="FX" />
    <Param name="FXFile" value="Parity.fx" />
    <Param name="Technique" value="Ripple" />
    <Semantics>
    <WaveControls evaluation="Linear" type="float2">
    <Point time="0.0" value="1.0,0.0"/>
    <Point time="1.0" value="0.0,1.0"/>
    </WaveControls>
    <WaveCenter evaluation="Step" type="float2">
    <Point time="0.0" value="0.5,0.5"/>
    </WaveCenter>
    <Frequency value="5.5" type="float">
    </Frequency>
    <Speed value="9.5" type="float">
    </Speed>
    <Height value="0.125" type="float">
    </Height>
    </Semantics>
    </Effect>
    <Effect name="3D Ripple Intense 7" iconid="0" guid="3D Ripple Intense 7" comment="3D Ripple Intense 7 by TheOnePb" shadermodel="2">
    <Param name="Animation" value="FX" />
    <Param name="FXFile" value="Parity.fx" />
    <Param name="Technique" value="Ripple" />
    <Semantics>
    <WaveControls evaluation="Linear" type="float2">
    <Point time="0.0" value="1.0,0.0"/>
    <Point time="1.0" value="0.0,1.0"/>
    </WaveControls>
    <WaveCenter evaluation="Step" type="float2">
    <Point time="0.0" value="0.5,0.5"/>
    </WaveCenter>
    <Frequency value="7.0" type="float">
    </Frequency>
    <Speed value="9.5" type="float">
    </Speed>
    <Height value="0.125" type="float">
    </Height>
    </Semantics>
    </Effect>
    <Effect name="3D Ripple Intense 8.5" iconid="0" guid="3D Ripple Intense 8.5" comment="3D Ripple Intense 8.5 by TheOnePb" shadermodel="2">
    <Param name="Animation" value="FX" />
    <Param name="FXFile" value="Parity.fx" />
    <Param name="Technique" value="Ripple" />
    <Semantics>
    <WaveControls evaluation="Linear" type="float2">
    <Point time="0.0" value="1.0,0.0"/>
    <Point time="1.0" value="0.0,1.0"/>
    </WaveControls>
    <WaveCenter evaluation="Step" type="float2">
    <Point time="0.0" value="0.5,0.5"/>
    </WaveCenter>
    <Frequency value="8.5" type="float">
    </Frequency>
    <Speed value="9.5" type="float">
    </Speed>
    <Height value="0.125" type="float">
    </Height>
    </Semantics>
    </Effect>
    <Effect name="3D Ripple Intense 10 MAX" iconid="0" guid="3D Ripple Intense 10 MAX" comment="3D Ripple Intense 10 MAX by TheOnePb" shadermodel="2">
    <Param name="Animation" value="FX" />
    <Param name="FXFile" value="Parity.fx" />
    <Param name="Technique" value="Ripple" />
    <Semantics>
    <WaveControls evaluation="Linear" type="float2">
    <Point time="0.0" value="1.0,0.0"/>
    <Point time="1.0" value="0.0,1.0"/>
    </WaveControls>
    <WaveCenter evaluation="Step" type="float2">
    <Point time="0.0" value="0.5,0.5"/>
    </WaveCenter>
    <Frequency value="10.0" type="float">
    </Frequency>
    <Speed value="9.5" type="float">
    </Speed>
    <Height value="0.125" type="float">
    </Height>
    </Semantics>
    </Effect>
    <Effect name="3D Ripple Boomerang" iconid="0" guid="3D Ripple Boomerang" comment="3D Ripple Boomerang by TheOnePb" shadermodel="2">
    <Param name="Animation" value="FX" />
    <Param name="FXFile" value="Parity.fx" />
    <Param name="Technique" value="Ripple" />
    <Semantics>
    <WaveControls evaluation="Linear" type="float2">
    <Point time="0.0" value="1.0,0.0"/>
    <Point time="0.5" value="0.0,1.0"/>
    <Point time="1.0" value="1.0,0.0"/>
    </WaveControls>
    <WaveCenter evaluation="Step" type="float2">
    <Point time="0.0" value="0.5,0.5"/>
    </WaveCenter>
    <Frequency value="4.0" type="float">
    </Frequency>
    <Speed value="9.5" type="float">
    </Speed>
    <Height value="0.125" type="float">
    </Height>
    </Semantics>
    </Effect>
    <Effect name="3D Ripple 1 Lefttop drop" iconid="0" guid="3D Ripple Lefttop drop" comment="3D Ripple Lefttop drop by TheOnePb" shadermodel="2">
    <Param name="Animation" value="FX" />
    <Param name="FXFile" value="Parity.fx" />
    <Param name="Technique" value="Ripple" />
    <Semantics>
    <WaveControls evaluation="Linear" type="float2">
    <Point time="0.0" value="1.0,0.0"/>
    <Point time="1.0" value="0.0,1.0"/>
    </WaveControls>
    <WaveCenter evaluation="Step" type="float2">
    <Point time="0.0" value="0.0,0.0"/>
    </WaveCenter>
    <Frequency value="4.0" type="float">
    </Frequency>
    <Speed value="9.5" type="float">
    </Speed>
    <Height value="0.125" type="float">
    </Height>
    </Semantics>
    </Effect>
    <Effect name="3D Ripple 2 Upper drop" iconid="0" guid="3D Ripple Upper drop" comment="3D Ripple Upper drop by TheOnePb" shadermodel="2">
    <Param name="Animation" value="FX" />
    <Param name="FXFile" value="Parity.fx" />
    <Param name="Technique" value="Ripple" />
    <Semantics>
    <WaveControls evaluation="Linear" type="float2">
    <Point time="0.0" value="1.0,0.0"/>
    <Point time="1.0" value="0.0,1.0"/>
    </WaveControls>
    <WaveCenter evaluation="Step" type="float2">
    <Point time="0.0" value="0.5,0.0"/>
    </WaveCenter>
    <Frequency value="4.0" type="float">
    </Frequency>
    <Speed value="9.5" type="float">
    </Speed>
    <Height value="0.125" type="float">
    </Height>
    </Semantics>
    </Effect>
    <Effect name="3D Ripple 3 Righttop drop" iconid="0" guid="3D Ripple Righttop drop" comment="3D Ripple Righttop drop by TheOnePb" shadermodel="2">
    <Param name="Animation" value="FX" />
    <Param name="FXFile" value="Parity.fx" />
    <Param name="Technique" value="Ripple" />
    <Semantics>
    <WaveControls evaluation="Linear" type="float2">
    <Point time="0.0" value="1.0,0.0"/>
    <Point time="1.0" value="0.0,1.0"/>
    </WaveControls>
    <WaveCenter evaluation="Step" type="float2">
    <Point time="0.0" value="1.0,0.0"/>
    </WaveCenter>
    <Frequency value="4.0" type="float">
    </Frequency>
    <Speed value="9.5" type="float">
    </Speed>
    <Height value="0.125" type="float">
    </Height>
    </Semantics>
    </Effect>
    <Effect name="3D Ripple 4 Right drop" iconid="0" guid="3D Ripple Right drop" comment="3D Ripple Right drop by TheOnePb" shadermodel="2">
    <Param name="Animation" value="FX" />
    <Param name="FXFile" value="Parity.fx" />
    <Param name="Technique" value="Ripple" />
    <Semantics>
    <WaveControls evaluation="Linear" type="float2">
    <Point time="0.0" value="1.0,0.0"/>
    <Point time="1.0" value="0.0,1.0"/>
    </WaveControls>
    <WaveCenter evaluation="Step" type="float2">
    <Point time="0.0" value="1.0,0.5"/>
    </WaveCenter>
    <Frequency value="4.0" type="float">
    </Frequency>
    <Speed value="9.5" type="float">
    </Speed>
    <Height value="0.125" type="float">
    </Height>
    </Semantics>
    </Effect>
    <Effect name="3D Ripple 5 Downright drop" iconid="0" guid="3D Ripple Downright drop" comment="3D Ripple Downright drop" shadermodel="2">
    <Param name="Animation" value="FX" />
    <Param name="FXFile" value="Parity.fx" />
    <Param name="Technique" value="Ripple" />
    <Semantics>
    <WaveControls evaluation="Linear" type="float2">
    <Point time="0.0" value="1.0,0.0"/>
    <Point time="1.0" value="0.0,1.0"/>
    </WaveControls>
    <WaveCenter evaluation="Step" type="float2">
    <Point time="0.0" value="1.0,1.0"/>
    </WaveCenter>
    <Frequency value="4.0" type="float">
    </Frequency>
    <Speed value="9.5" type="float">
    </Speed>
    <Height value="0.125" type="float">
    </Height>
    </Semantics>
    </Effect>
    <Effect name="3D Ripple 6 Down drop" iconid="0" guid="3D Ripple Down drop" comment="3D Ripple Down drop" shadermodel="2">
    <Param name="Animation" value="FX" />
    <Param name="FXFile" value="Parity.fx" />
    <Param name="Technique" value="Ripple" />
    <Semantics>
    <WaveControls evaluation="Linear" type="float2">
    <Point time="0.0" value="1.0,0.0"/>
    <Point time="1.0" value="0.0,1.0"/>
    </WaveControls>
    <WaveCenter evaluation="Step" type="float2">
    <Point time="0.0" value="0.5,1.0"/>
    </WaveCenter>
    <Frequency value="4.0" type="float">
    </Frequency>
    <Speed value="9.5" type="float">
    </Speed>
    <Height value="0.125" type="float">
    </Height>
    </Semantics>
    </Effect>
    <Effect name="3D Ripple 7 Downleft drop" iconid="0" guid="3D Ripple Downleft drop" comment="3D Ripple Downleft drop" shadermodel="2">
    <Param name="Animation" value="FX" />
    <Param name="FXFile" value="Parity.fx" />
    <Param name="Technique" value="Ripple" />
    <Semantics>
    <WaveControls evaluation="Linear" type="float2">
    <Point time="0.0" value="1.0,0.0"/>
    <Point time="1.0" value="0.0,1.0"/>
    </WaveControls>
    <WaveCenter evaluation="Step" type="float2">
    <Point time="0.0" value="0.0,1.0"/>
    </WaveCenter>
    <Frequency value="4.0" type="float">
    </Frequency>
    <Speed value="9.5" type="float">
    </Speed>
    <Height value="0.125" type="float">
    </Height>
    </Semantics>
    </Effect>
    <Effect name="3D Ripple 8 Left drop" iconid="0" guid="3D Ripple Left drop" comment="3D Ripple Left drop" shadermodel="2">
    <Param name="Animation" value="FX" />
    <Param name="FXFile" value="Parity.fx" />
    <Param name="Technique" value="Ripple" />
    <Semantics>
    <WaveControls evaluation="Linear" type="float2">
    <Point time="0.0" value="1.0,0.0"/>
    <Point time="1.0" value="0.0,1.0"/>
    </WaveControls>
    <WaveCenter evaluation="Step" type="float2">
    <Point time="0.0" value="0.0,0.5"/>
    </WaveCenter>
    <Frequency value="4.0" type="float">
    </Frequency>
    <Speed value="9.5" type="float">
    </Speed>
    <Height value="0.125" type="float">
    </Height>
    </Semantics>
    </Effect>
    </EffectDLL>
    </Effects>
    </TransitionsAndEffects>


    3. Save your file in .xml format to your documents or any other location you wish. For the purpose of this tutorial, I have named the file 'NewRippleEffect.xml'. It is important that it is saved with the '.xml' in order for the custom content to work. Do not save it as 'NewRippleEffect.txt' despite the 'save as type' drop-down menu remaining as 'Text Documents(*.txt)'

    Spoiler Alert, click show to read: 


    4. Move NewRippleEffect.xml to your AddOnTFX folder in C:\Program Files\Movie Maker\Shared

    Spoiler Alert, click show to read: 


    5. Turn on or restart movie maker. You should be able to find the new effects, transitions or titles in the relevant categories.

    Spoiler Alert, click show to read: 


    My short example video using my own Napoleon footage, one of the newly added ripple effects and a bloom transition from Blaine's addons.


    Part II: The Overlay Technique for Windows Movie Maker

    Spoiler Alert, click show to read: 
    The Overlay Technique for Windows Movie Maker

    Now that we know how to add custom content, we will teach you how to make good use of a certain addon, PapaJohn's Vista Overlays. In some of the Total War games, it can be considered quite hard to hide the entire UI. As a remedy to this, we can hide the UI ourselves using this nice little technique.

    1. Download PapaJohn's Vista Overlays here for Vista/Win7 or here for XP

    2. Thankfully, this addon does require you to make the XML document yourself, so extract the XML document to C:/Program Files/Movie Maker/Shared/AddonTFX Ignore the .png images and do not extract them!

    Location of AddonTFX folder:
    Spoiler Alert, click show to read: 


    3. We will be using a pre-made black border in order to hide the UI. I made a new .png using a transparent background and added a black border to it, big enough to hide the game's UI.

    Here is the background image I used, either make your own or save this one to your computer and make sure it is in .png format.
    Spoiler Alert, click show to read: 


    4. Rename your background image as overlay1, you won't have to if you use my background.

    Spoiler Alert, click show to read: 


    5. Copy and paste the new overlay1.png file into your C:/Program Files/Movie Maker/Shared/

    Spoiler Alert, click show to read: 


    6. Start up Windows Movie Maker, select the first scene from your movie and try to add text by using 'Title on the selected clip'. You should see the overlay as the options for the 'change title animation' as 'overlay1'. You will have to write something in order for the border to work, so just put a space in the 'Enter text for title' area.

    Spoiler Alert, click show to read: 


    7. You should now be able to see the overlay over the selected first clip, extend the border across the entire movie.

    Spoiler Alert, click show to read: 


    5. Play your movie and see if the border works

    My Example video - showing a before and after using the technique


    • Aspect Ratio found in "options" is your personal choice:


    • 4:3 format = standard TV
    • 16:9 format = widescreen
    • It is better to use the SPLIT command (CTRL L key) to reduce the size of a clip, than the "dragging re-size", unless you think you may need that footage later. Using "split" more often will increase the chance of a successful render when you are ready to publish. Split out and delete (DEL key) the starts and finishes of your clips where there is likely to be an in-game "pause" screen.
    • Manipulating the speed of a clips may reduce the quality of the resolution.
    • The "Lewis Screen Fix" likely won't work in any MM that you are using in Windows 7
    • For Windows 7 users (regardless of what version), a dirty alternative to the Lewis Screen Fix is to apply the effects EASE IN and EASE OUT simultaneously. This will clean most of the HUD, but you will lose some resolution.
    • Try effects and transitions such as fade in/out and dissolve, as well as overlapping the start/finish of two clips. You can play with other effects, but be careful not to overuse them.
    • Render/publish selecting the option that allows use on your computer. Always render in the highest quality available (default).


    • 3 major contributors of a MM crash or a failed final render:

    Spoiler Alert, click show to read: 
    1. Insufficient audio/visual codecs on your computer. Where to get extensive and current audio/visual codecs:
    http://www.free-codecs.com/download/...codec_pack.htm (this package also gives you Media Player Classic, a very useful and versatile media player that can play just about anything, at superior quality to Windows Media Player...a useful tool for making videos.)
    2. To much "hidden" video on your timeline in un-used portions of clips (solution: use SPLIT more often)

    3. Other programs running (rendering uses up alot of CPU and memory, and will often crash if you have too many other programs running in the background).

    • When uploading on YouTube, during the upload, select PRIVATE as the privacy setting, and then SAVE CHANGE. After the video has finished, then EDIT the video and select UNLISTED as the privacy setting. This is due to an occasional YouTube glitch that makes a vid public with you initially select unlisted during the upload.
    • To post a YouTube vid in a playable box here in the forums, select the YouTube tags (while in advanced posting options), and then place all the YouTube link info that FOLLOWS the = sign.


    Assignment for Lesson 3/4 (due June 9th)

    • Post a draft of your video in this thread. This won't be your final copy, but we will be looking for a general cohesion to the video that should include some effects, text, transitions and a variety of audio (combination of in-game sound and, if you choose, music).

    (For the final Lesson 5, we will be providing specific tips for each of your vids, and the production of a final version will be your last assignment.)


    Additional Posts of Importance
    More Overlays by Lewis
    Rendering Crash Troubleshooting
    Emergency Rendering Procedure
    How to fix clipping in MM
    Rendering in HD in MM
    Last edited by Nanny de Bodemloze; June 20, 2010 at 09:08 PM.

  2. #2
    Nanny de Bodemloze's Avatar Treason is just dates
    Artifex

    Join Date
    Nov 2009
    Location
    Canada
    Posts
    2,753

    Default Re: LESSONS 3 and 4 (COMBINED): NAVIGATING, EDITING and PUBLISHING in MOVIE MAKER (assignment due June 9th)

    sorry for being a day or two late on this folks...just as I was redesigning the whole approach, I had a couple of RL issues pop up...thx for your patience everyone


    EDIT - because so much of this lesson is on the instructional video, and since I have a wonky Canuck accent don't hesitate to post here for clarification on any of the points...there are a number of people here who's native tongue is not English, so if there is something that you didn't understand, don't assume its just you
    Last edited by Nanny de Bodemloze; June 01, 2010 at 03:22 PM.

  3. #3
    John Doe's Avatar Primicerius
    Join Date
    Apr 2009
    Location
    Scotland
    Posts
    3,530

    Default Re: LESSONS 3 and 4 (COMBINED): NAVIGATING, EDITING and PUBLISHING in MOVIE MAKER (assignment due June 9th)

    I'm going to certainly miss the dateline (9th june). First, I ususally work 3 days a week, but with summer I have to cover for my collegue's holidays. So I'm in for some 65h work + 10h travel/week (like the squirel, I need to gather enough nuts/money to make it through the winter) + walking on thin ice with gf atm. And second, things I want to do to make it special can't be done with the custom battles, it must happen in a campaign, with specific units, and sometime the AI must attack me at the right place, at the right season and with the right weather. Already tried to setup some of the situations, and it's a

  4. #4
    Nanny de Bodemloze's Avatar Treason is just dates
    Artifex

    Join Date
    Nov 2009
    Location
    Canada
    Posts
    2,753

    Default Re: LESSONS 3 and 4 (COMBINED): NAVIGATING, EDITING and PUBLISHING in MOVIE MAKER (assignment due June 9th)

    zyxos...no worries mate! We all have real lives interfering with our fun Thanks for the heads-up, we'll provide you with lesson support for as long as you need regardless of where the class is. cheers!

  5. #5
    LuckyLewis's Avatar Loutre
    Content Emeritus

    Join Date
    Jun 2006
    Location
    United Kingdom
    Posts
    3,957

    Default Re: LESSONS 3 and 4 (COMBINED): NAVIGATING, EDITING and PUBLISHING in MOVIE MAKER (assignment due June 9th)

    Yeah, don't worry about it! Besides, this lesson is probably the longest of the course, so take your time!
    Muh signature is so out of date all muh pictures died.

  6. #6
    Nanny de Bodemloze's Avatar Treason is just dates
    Artifex

    Join Date
    Nov 2009
    Location
    Canada
    Posts
    2,753

    Default Re: LESSONS 3 and 4 (COMBINED): NAVIGATING, EDITING and PUBLISHING in MOVIE MAKER (assignment due June 9th)

    ya, just remember...the draft is the assignment, not a completely polished everything perfect finished product. Half the battle might be in the rendering for some, so getting something in draft up on YouTube is more important than precision for this week.

  7. #7

    Default Re: LESSONS 3 and 4 (COMBINED): NAVIGATING, EDITING and PUBLISHING in MOVIE MAKER (assignment due June 9th)

    is it possible to move a camera group in time ? like 10s later for example ?in cined that is
    Last edited by BURNY26; June 01, 2010 at 08:39 PM.
    Son of the now supersilly walking MasterBigAb/戦国無双


  8. #8
    MasterBigAb's Avatar Valar Morghulis
    Content Emeritus

    Join Date
    May 2009
    Location
    Vaes Dothrak
    Posts
    10,771

    Default Re: LESSONS 3 and 4 (COMBINED): NAVIGATING, EDITING and PUBLISHING in MOVIE MAKER (assignment due June 9th)

    Quote Originally Posted by zyxos View Post
    I'm going to certainly miss the dateline (9th june). First, I ususally work 3 days a week, but with summer I have to cover for my collegue's holidays. So I'm in for some 65h work + 10h travel/week (like the squirel, I need to gather enough nuts/money to make it through the winter) + walking on thin ice with gf atm. And second, things I want to do to make it special can't be done with the custom battles, it must happen in a campaign, with specific units, and sometime the AI must attack me at the right place, at the right season and with the right weather. Already tried to setup some of the situations, and it's a
    Actually there is a unknown possibitlity to save campaig battles...
    But it has to be vanilla game.
    After a battle show the results and the advanced informations, than open the consol and typ in "save_battle_replay name" for name of course you can choose what you want...
    Now it should be saved in the replay folder in your medieval 2 one

  9. #9
    Nanny de Bodemloze's Avatar Treason is just dates
    Artifex

    Join Date
    Nov 2009
    Location
    Canada
    Posts
    2,753

    Default Re: LESSONS 3 and 4 (COMBINED): NAVIGATING, EDITING and PUBLISHING in MOVIE MAKER (assignment due June 9th)

    Master...any insight into Burny's question?

  10. #10
    MasterBigAb's Avatar Valar Morghulis
    Content Emeritus

    Join Date
    May 2009
    Location
    Vaes Dothrak
    Posts
    10,771

    Default Re: LESSONS 3 and 4 (COMBINED): NAVIGATING, EDITING and PUBLISHING in MOVIE MAKER (assignment due June 9th)

    Quote Originally Posted by ♔The Nanny♔ View Post
    Master...any insight into Burny's question?
    Oh sorry i didn't read it cause i was in hurry, sorry
    Sorry to tell you, but the only possibility to move one camera about 10 seconds later would be to double click on the line ten seconds after your end, and change (if neccessary) the position so it's the same, it's quite easy cause you see it's the same when the lines between them are straight...than delete the old camera end, and also double click ten secodns after the camera beginning on the line an if neccessary change it as described...
    Though i think it more or less is as time consuming as making the track again...

  11. #11
    Hesus de bodemloze's Avatar The Gaul
    Civitate Patrician Content Emeritus

    Join Date
    Aug 2006
    Location
    Belgium
    Posts
    12,313

    Default Re: LESSONS 3 and 4 (COMBINED): NAVIGATING, EDITING and PUBLISHING in MOVIE MAKER (assignment due June 9th)

    So what codes do we need to copy past in the notepad if we are using XP? Isn't there a list of effect that we will use?
    Horum omnium fortissimi sunt Belgae :
    Hesus 's Photo Gallery
    The Writers Study|Ex-Global Moderator|Moderation Mentor| Ex - Librarian of the Scriptorium|PoTW|MAARC|ToTW
    SPQR Forum Moderator

  12. #12
    Nanny de Bodemloze's Avatar Treason is just dates
    Artifex

    Join Date
    Nov 2009
    Location
    Canada
    Posts
    2,753

    Default Re: LESSONS 3 and 4 (COMBINED): NAVIGATING, EDITING and PUBLISHING in MOVIE MAKER (assignment due June 9th)

    http://www.windowsmoviemakers.net/Fo...?&PostID=74030

    This is Lewis' wheelhouse, but here is the link to XP codes that he posted.

    You can use whatever effects you wish...in the instruction videos, I talk a little bit about some of the effect and my thoughts on a few specific ones...my only message is whichever effect you decide to use, just don't over-use them in your final product (but some are fun to play around with). Is this what you were asking about?

    (btw...in MM, I've never used anything but the stock effects...the only extra thing I've ever added was Lewis' Screen Fix after he told me about it)

  13. #13

    Default Re: LESSONS 3 and 4 (COMBINED): NAVIGATING, EDITING and PUBLISHING in MOVIE MAKER (assignment due June 9th)

    Well, this is the moment I was waiting for! It took me about 5 hours of work (yesterday and today) to create this little video, but I really enjoyed it!

    It is not meant to be a masterpiece or anything, but feel free to comment on what YOU do NOT like / appreciate. Any feedback is most welcome.

    After I receive some feedback, I will also post some questions of mine.

    My choice of music is a bit eccentric. I had this track handy and decided to use it even though this is not what I had in mind originally. I will probably change the music for the final version of the video, but please comment on the current track.

    Please click this link to youtube with my attempt. Preferably watch in high res.
    |--------------------------------------------------|
    |Patience is a virtue. Indecision is a vice.|
    |--------------------------------------------------|

  14. #14
    Nanny de Bodemloze's Avatar Treason is just dates
    Artifex

    Join Date
    Nov 2009
    Location
    Canada
    Posts
    2,753

    Default Re: LESSONS 3 and 4 (COMBINED): NAVIGATING, EDITING and PUBLISHING in MOVIE MAKER (assignment due June 9th)

    Quote Originally Posted by Demetrios2008 View Post
    Well, this is the moment I was waiting for! It took me about 5 hours of work (yesterday and today) to create this little video, but I really enjoyed it!

    It is not meant to be a masterpiece or anything, but feel free to comment on what YOU do NOT like / appreciate. Any feedback is most welcome.

    After I receive some feedback, I will also post some questions of mine.

    My choice of music is a bit eccentric. I had this track handy and decided to use it even though this is not what I had in mind originally. I will probably change the music for the final version of the video, but please comment on the current track.

    Please click this link to youtube with my attempt. Preferably watch in high res.

    For the final lesson, we will be giving some more "polishing" type tips for the individual vids, but these will mainly focus on the editing, rather than the raw clips. Also, since you used CinEd, MasterBigAb can give you better pointers than I can...but here are my observations/suggestions:


    • Applying Lewis' screen fix may help get rid of the counter and playback HUD noise at the top of the screen
    • I didn't mind the music ...I like how it faded in
    • good transition effects...weren't over-used and weren't distracting
    • in CinEd, are you able to get a lower camera angle? think like eye level or even waist-level for a shot or 2, to bring the viewer into the action

    :07 back and forth camera movement doesn't look realistic
    :20 flag clipping (the camera "runs through" the unit flags)
    :29 camera drop is sudden, a bit un-natural looking
    :54 good shot of cav
    1:27 jerky sliding horizontal camera
    1:44 good overlapping fade
    1:38 saw unit description boxes...need to use another clip

    For the camera movement issues, such as at :07 and :29, try to imagine what filming this would look like in a real-life movie...a camera on a crane wouldn't look like that. Usually, a single film clip should only have 1 type of movement in 1 direction, or if not it should be following a smooth path. The only exception to this would be in-the-action hand held cam, done at eye level, with up-close jerky movements ala Saving Private Ryan. If you want a camera to, for example, pan left to right, and then move from high in sky to low, use 2 different FRAPS clips, and overlap them. However, moving the camera in several different directions in the same clip doesn't look "natural".

    I really must say that your use of effects and transitions was pretty good. You didn't over-use it...it wasn't cheesy (the b&w dead scene was cool...and with the music is done tongue-in-cheek), and it was never distracting. The pacing of your clips with the music was also good...something that usually takes alot of practice to get right.

    Good job!

  15. #15
    LuckyLewis's Avatar Loutre
    Content Emeritus

    Join Date
    Jun 2006
    Location
    United Kingdom
    Posts
    3,957

    Default Re: LESSONS 3 and 4 (COMBINED): NAVIGATING, EDITING and PUBLISHING in MOVIE MAKER (assignment due June 9th)

    Quote Originally Posted by Hesus de bodemloze View Post
    So what codes do we need to copy past in the notepad if we are using XP? Isn't there a list of effect that we will use?
    Sorry about that Hesus, I should have made it clearer for XP users. Simply try out any from that list I provided (the one which Nanny just posted). Part I of my little guide is simply used for you to understand how to install custom content into Movie Maker, Part II is more in depth for both XP and Vista users shows how to use probably one of only a few custom effects I'd suggest as useful.

    _________

    Hi Demetrios2008, That was a very nice video. I thought that hilarious about the general going berserk.

    I think Nanny pretty much got it spot on, and that is brilliant feedback for you to work on for your final project and in the future and as a result of that feedback, I don't really have much to add myself. I'd suggest using the black bar technique also,or if you are using Windows 7, using the Ease IN and Ease Out technique that the Nanny suggested in the instructional videos. Thankfully, it looks like you managed to keep the mouse in the top of the screen for the majority of the time, so you will be able to hide that too.

    While the music is hardly suitable for the Roman Era, I think it fits perfectly with your video, I actually really like it and if the music wasn't so fast paced, the video wouldn't have been good. Keep it up and I look forward to your final project!
    Muh signature is so out of date all muh pictures died.

  16. #16
    LuckyLewis's Avatar Loutre
    Content Emeritus

    Join Date
    Jun 2006
    Location
    United Kingdom
    Posts
    3,957

    Default Re: LESSONS 3 and 4 (COMBINED): NAVIGATING, EDITING and PUBLISHING in MOVIE MAKER (assignment due June 9th)

    I have attached 3 more different overlays along with the one I provided in the guide for the black bar technique in this post. The original one I posted may not always be so necessary if you need to cover a smaller area of the UI different to that I showed in the example video.
    Last edited by LuckyLewis; June 02, 2010 at 01:20 PM.
    Muh signature is so out of date all muh pictures died.

  17. #17
    John Doe's Avatar Primicerius
    Join Date
    Apr 2009
    Location
    Scotland
    Posts
    3,530

    Default Re: LESSONS 3 and 4 (COMBINED): NAVIGATING, EDITING and PUBLISHING in MOVIE MAKER (assignment due June 9th)

    Quote Originally Posted by MasterBigAb View Post
    Actually there is a unknown possibitlity to save campaig battles...
    But it has to be vanilla game.
    After a battle show the results and the advanced informations, than open the consol and typ in "save_battle_replay name" for name of course you can choose what you want...
    Now it should be saved in the replay folder in your medieval 2 one
    What I did was to go to the sega/m2tw/temp folder, copy paste the campaign_battle.rpy file to the replay folder, but each time I tried to view it with the replay, I have a CTD. I tried that way when my UAC was on, so I fornated my HD and reinstalled vista and M2 without the UAC, but I still get CTD. Just tried your way and CTD happened again. I asked the question in the tech forum a few month ago, but no answer.

  18. #18

    Default Re: LESSONS 3 and 4 (COMBINED): NAVIGATING, EDITING and PUBLISHING in MOVIE MAKER (assignment due June 9th)

    @ The Nanny: Thanks a lot for the detailed feedback!!! 1.38 ...you have a sharp eye m8! I agree with all your remarks.

    However, CinEdit does not work with RTW, only M2TW. What I just managed to dig up after some more extensive search in the internet is some guideliness for the movie-cam, which is a cinematic editor for RTW and which I will use in order to re-do my video from scratch! (I knew that something like this existed but did not quite remember how it was called). It is like double work, but I look forward to re-doing everything with a more promising tool!

    @ Luckylewis: Thank you for the feedback, glad you find the fast paced music fitting!!!
    |--------------------------------------------------|
    |Patience is a virtue. Indecision is a vice.|
    |--------------------------------------------------|

  19. #19
    Nanny de Bodemloze's Avatar Treason is just dates
    Artifex

    Join Date
    Nov 2009
    Location
    Canada
    Posts
    2,753

    Default Re: LESSONS 3 and 4 (COMBINED): NAVIGATING, EDITING and PUBLISHING in MOVIE MAKER (assignment due June 9th)

    Quote Originally Posted by Demetrios2008 View Post
    @ The Nanny: Thanks a lot for the detailed feedback!!! 1.38 ...you have a sharp eye m8! I agree with all your remarks.

    However, CinEdit does not work with RTW, only M2TW. What I just managed to dig up after some more extensive search in the internet is some guideliness for the movie-cam, which is a cinematic editor for RTW and which I will use in order to re-do my video from scratch! (I knew that something like this existed but did not quite remember how it was called). It is like double work, but I look forward to re-doing everything with a more promising tool!

    @ Luckylewis: Thank you for the feedback, glad you find the fast paced music fitting!!!
    lol so much for my sharp eye! So this was done in FRAPS then? I didn't see the FRAPS logo, and so my mind instantly went to cinEd

    Well, I'm not sure you need to redo your whole vid from scratch...this is a good draft effort, and if the RTW camera controls are limiting well then they are limiting and you do what you can.

  20. #20
    MasterBigAb's Avatar Valar Morghulis
    Content Emeritus

    Join Date
    May 2009
    Location
    Vaes Dothrak
    Posts
    10,771

    Default Re: LESSONS 3 and 4 (COMBINED): NAVIGATING, EDITING and PUBLISHING in MOVIE MAKER (assignment due June 9th)

    Sorry guys i have no connection at my computer, i am really sorry but i can take care and read all the posts later or even in a few days, but i surly will of course

    @ demetrios: i think there also is a CinEd for Rome, but i don't own this game so i can't help, sorry, may be you could take a look at the rome forums if there is a tutorial or something like that, i can imagen it might be simmilar to the medieval cined ( i can'T check that for you sry due to the reason i just posted...)
    (- nevermind, just recognized you know about the editor)

    @ zyxos:

    It isn't known much about this way, but it is known that it sometimes works for some replays, sometimes not, also some useres say it works, some day it doesn't but noone knows why, sorry... (for me it doesn't too)
    Last edited by MasterBigAb; June 03, 2010 at 08:27 AM.

Page 1 of 7 1234567 LastLast

Posting Permissions

  • You may not post new threads
  • You may not post replies
  • You may not post attachments
  • You may not edit your posts
  •